Wall Art Guide, Wall Art Tutoriels
Pottery Wall Art: Ceramic Vessel & Plate Collections
Mar
So I’ve been down this pottery wall art rabbit hole for like three months now and honestly it started because a client wanted to fill this massive blank wall in her dining room but didn’t want another boring gallery wall with frames. Fast forward to me having ceramic plates and vessels scattered across my studio floor trying to figure out what actually works.
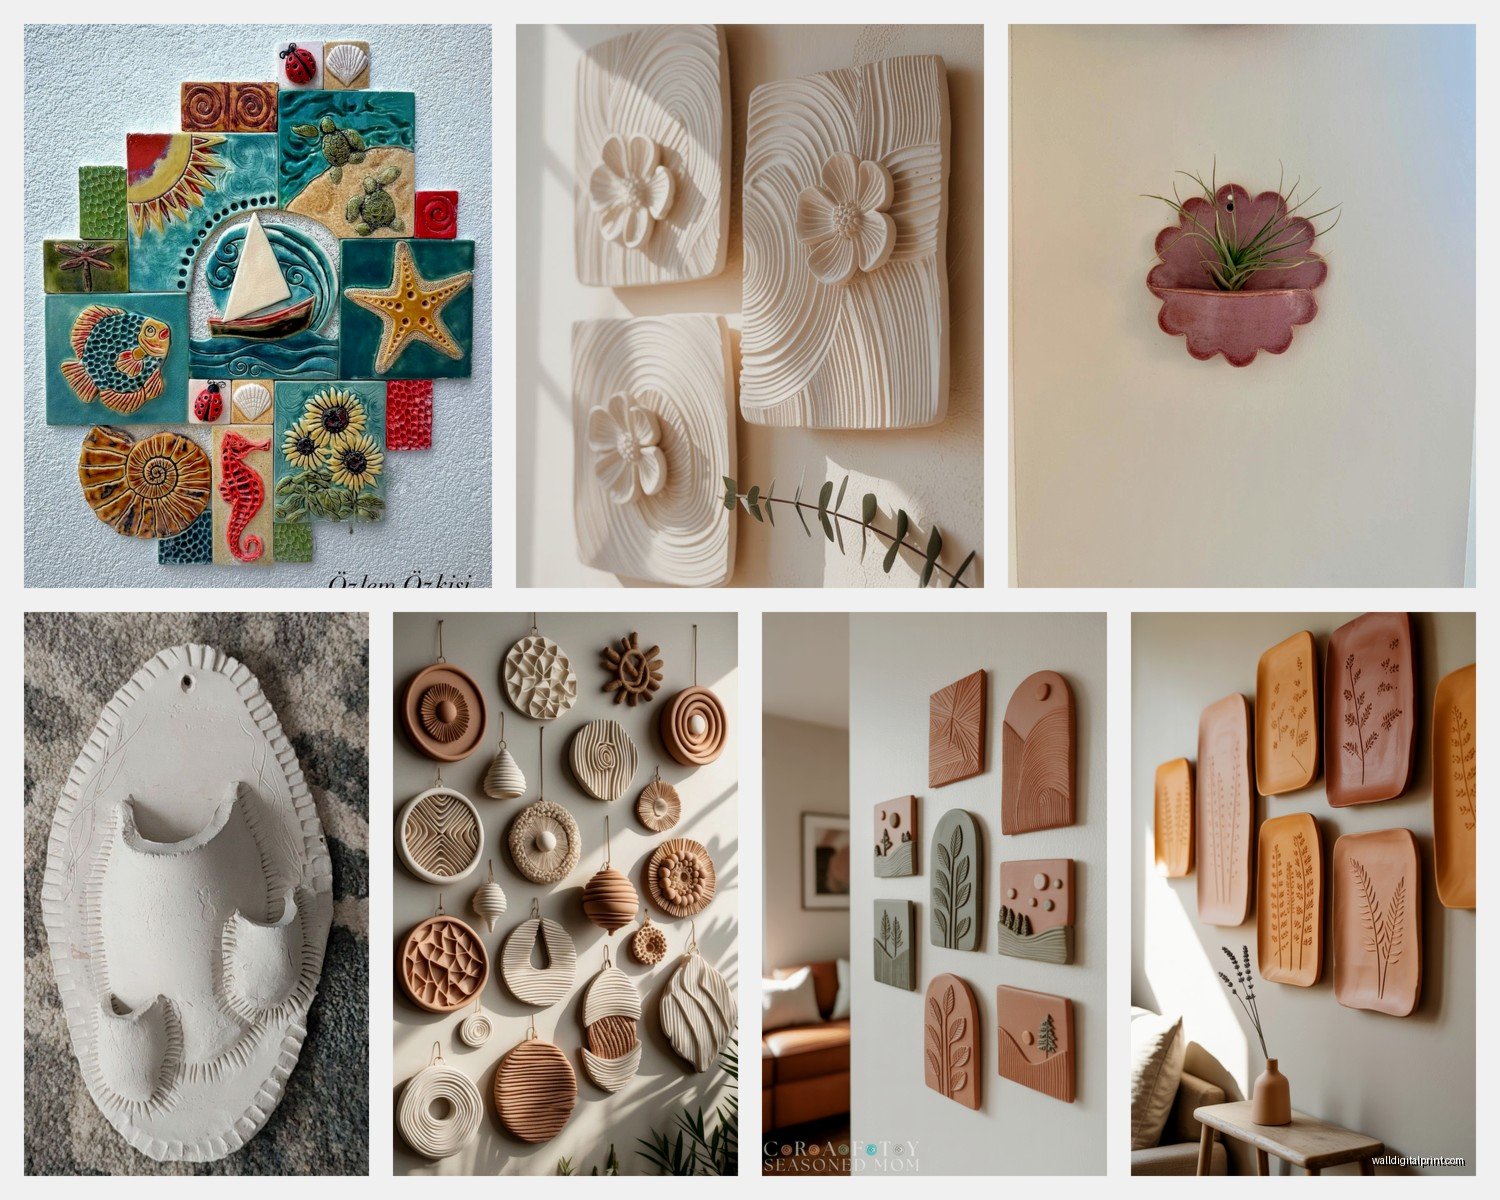
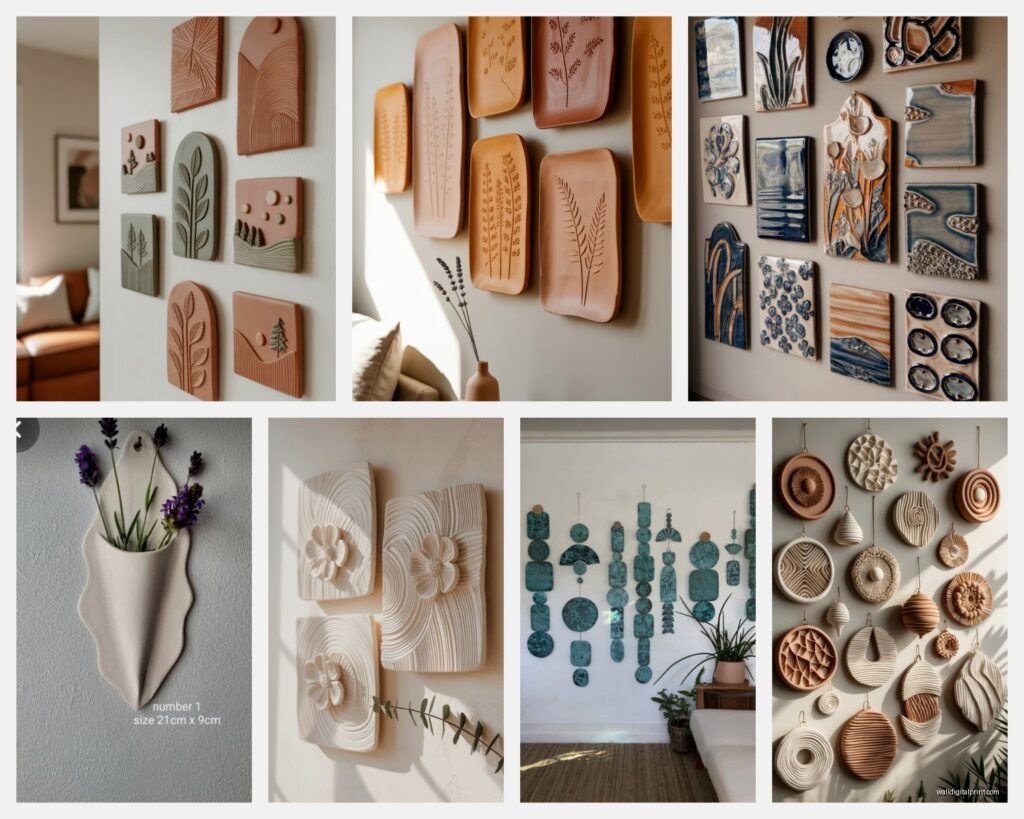
The Different Types You’re Gonna See
Okay so there’s basically three categories of pottery wall art that people confuse all the time. There’s decorative plates which are exactly what they sound like, ceramic vessels like bowls and vases that mount on walls, and then sculptural ceramic pieces that are specifically made for walls. The prices are all over the place which is… frustrating when you’re trying to budget.
Decorative plates range from like $15 for mass-produced stuff at HomeGoods to $300+ for handmade artisan pieces. I’ve bought both ends of the spectrum and here’s the thing nobody tells you—the cheaper plates aren’t necessarily bad, they just have a totally different vibe. The $15 plates are usually lighter, thinner, and have printed designs rather than hand-painted. They work great if you’re doing a big installation where you need like 12 plates and can’t drop $2000 on a wall.
The handmade artisan plates though… they have this weight and texture that photographs can’t capture. I got this one from a potter in North Carolina, cost me $180, and it has these little irregularities in the glaze that catch light differently throughout the day. My cat knocked it off the table before I hung it and I literally almost cried.
Weight and Mounting Situations
This is where people mess up constantly. You HAVE to think about weight before you buy. I learned this the hard way when a beautiful ceramic vessel came crashing down at 2am and scared me so badly I dropped my phone in my water glass.
Standard decorative plates usually weigh between 1-3 pounds. Ceramic vessels and bowls can be anywhere from 2-8 pounds depending on size and thickness. Those big sculptural pieces can hit 10-15 pounds easy. Your mounting hardware needs to match this or you’re gonna have problems.
For plates under 3 pounds, those basic plate hangers with the spring-loaded clips work fine. I like the ones from Tripar better than the generic Amazon ones because the springs are actually strong enough to hold the plate securely. They’re like $3 each which adds up when you’re doing multiple plates but whatever.
Anything over 3 pounds needs proper wall anchors. I use the HillmanToggler SnapSkru anchors for drywall and they’ve never failed me. For plaster walls which I deal with constantly in older homes, you need actual screws into studs or those heavy-duty toggle bolts. Don’t skip this step because your insurance probably won’t cover “I used the wrong hardware” as a reason for damages.
Mixing Styles Without Looking Chaotic
Oh and another thing—people always ask how to mix different pottery styles without it looking like a thrift store exploded on their wall. I’ve tested probably 15 different arrangement styles at this point and here’s what actually works.
Stick to a maximum of three color families. This doesn’t mean three exact colors, but three general palettes. Like blues ranging from navy to powder blue counts as one family. Earth tones—terracotta, cream, brown—that’s another family. You can have different patterns and textures within those families but more than three color families starts looking scattered.
I did this installation last month with all blue and white pottery, different patterns—some had florals, some geometric, some solid—but keeping that blue and white constraint made it feel cohesive even though I mixed modern pieces with vintage finds. The client added one yellow plate because she “loved it” and it immediately looked wrong. We replaced it with a cream colored piece and everything clicked.
Size variation matters more than people think. If all your pieces are the same size, it looks like a weird grid even if you arrange them organically. I aim for pieces that vary by at least 2-3 inches in diameter. So if your smallest plate is 8 inches, your largest should be at least 13-14 inches. This creates visual rhythm which sounds super art-school pretentious but it’s just… true.
Where to Actually Source Good Pieces
Etsy is obvious but you gotta know how to search. Don’t just type “ceramic wall art” because you’ll get 50,000 results of mass-produced stuff. Search for specific terms like “handmade pottery plate,” “ceramic wall vessel,” “artisan wall bowl.” Filter by location if you want to support local artists or if you’re trying to avoid international shipping times which can be brutal.
I’ve found amazing pieces from potters who don’t even realize they’re making wall art. Search for “decorative pottery bowl” and then just… mount it on your wall. Some of my favorite installations use pieces that were meant to be functional but look incredible on walls.
Estate sales and antique shops are goldmines if you have patience. I found this set of six vintage French plates for $40 total at an estate sale in Connecticut. They had some crazing in the glaze which some people would consider damage but I think it adds character. Just check for actual cracks because those can worsen over time, especially with temperature changes.
West Elm and CB2 have decent mid-range options if you want something now and don’t wanna hunt. Their stuff runs $40-$120 per piece typically. It’s not unique but it’s well-made and they understand weight distribution so the mounting hardware they recommend actually works.
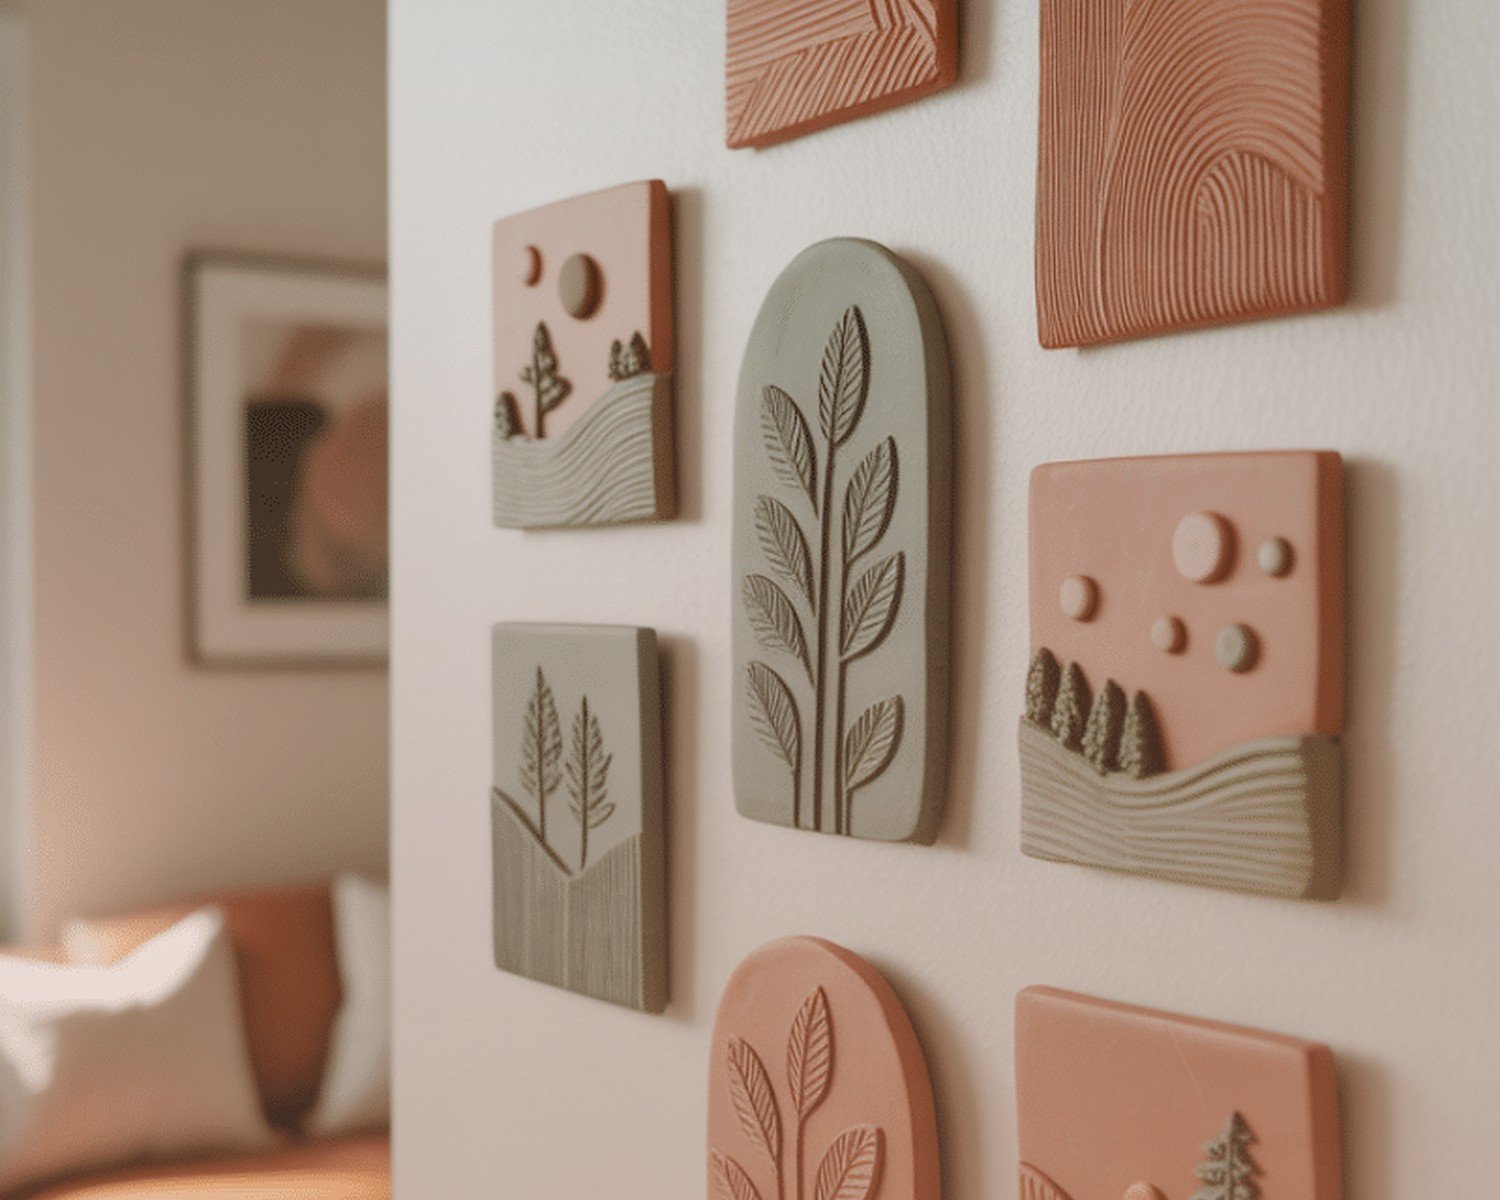
The Arrangement Process That Actually Works
This is gonna sound weird but I arrange everything on the floor first. Every. Single. Time. Even after doing this professionally for years, I still can’t visualize the final arrangement just by looking at a wall.
Clear a floor space the approximate size of your wall area. Lay out all your pieces and take a photo from above. This lets you see the composition from a flattened perspective which is closer to how you’ll view it on the wall. Move pieces around, take more photos, compare them on your phone.
Once you have an arrangement you like, measure the distances between each piece. I use painter’s tape on the floor to mark the centers of each piece, then measure from tape to tape. Write these measurements down because you will forget them. I’ve remeasured the same arrangement three times because I was too lazy to write it down the first two times.
Wait I forgot to mention—start with your largest or most visually dominant piece first. This becomes your anchor point. Everything else gets positioned relative to this piece. Mark where this piece will go on your wall, hang it, then work outward from there.
The spacing between pieces should be between 2-4 inches generally. Closer than 2 inches starts feeling cramped. More than 4 inches and they start reading as separate elements rather than a cohesive collection. I usually go with 3 inches as my default and adjust from there.
Dealing With Different Wall Types
Drywall is the easiest obviously. Plaster is tricker but manageable. Brick and concrete require masonry bits and anchors which is a whole different situation. I did an installation on exposed brick last year and it took three times longer than expected because finding the right drilling spots was a nightmare.
For textured walls like knockdown or popcorn texture, you might need to create a flat mounting surface. I’ve used small wooden mounting blocks painted to match the wall color. Nobody notices them once the pottery is up, and it gives you a solid surface to screw into.
Tile walls are actually great for this if you’re working in a kitchen or bathroom. You can use adhesive hooks rated for the weight, or drill through grout lines if you need something more permanent. Just use a tile bit and go slow to avoid cracking.
Temperature and Humidity Considerations
Ceramic is pretty stable but extreme temperature changes can cause issues, especially with pieces that have existing hairline cracks. Don’t hang pottery directly above radiators or heating vents. I had a beautiful piece develop a crack after a winter of being blasted with hot air from a floor vent underneath it.
Bathrooms with high humidity are generally fine for glazed pottery but unglazed pieces can absorb moisture over time. If you’re doing a bathroom installation, stick with fully glazed pieces and make sure your bathroom has decent ventilation.
Mixing Vessels and Plates
This creates the most visual interest honestly. Flat plates alone can look a bit one-dimensional. Adding some ceramic vessels or bowls that project off the wall creates shadow play and depth.
When mixing depths, position your vessels strategically. I usually place them off-center or asymmetrically rather than right in the middle of a plate arrangement. The goal is to create visual movement—your eye should travel around the composition rather than landing on one spot and staying there.
Vessels also work great for transitioning between different wall sections. Like if you have a corner or you’re wrapping around a small wall protrusion, a ceramic bowl can help carry the arrangement around that architectural feature.
Maintenance Nobody Talks About
Dust accumulates on wall-mounted pottery just like everything else. Every few months I go around with a microfiber duster and hit all my installations. For pieces I can easily take down, I’ll wash them gently in lukewarm water with mild soap maybe once or twice a year.
The mounting hardware can loosen over time, especially if you’re in an older building with any settling or movement. I check the security of pieces every six months or so. Just gently try to wiggle each piece—if there’s any movement, tighten the hardware.
Watch for any changes in the pottery itself. Hairline cracks can develop or worsen. If you notice a crack forming, take that piece down and either repair it with epoxy designed for ceramics or replace it. A piece falling and shattering is not worth the risk.
Budget Breakdown From My Recent Project
I just finished a collection for my own kitchen so I can give you real numbers. I wanted a mix of vintage and new pieces, mostly blue and white with some earth tones.
Three handmade plates from Etsy potters: $420 total
Five vintage plates from various estate sales: $65 total
Two ceramic vessels from a local artist: $240 total
Mounting hardware for everything: roughly $45
Total: $770
That’s for a pretty substantial installation covering about 8 feet of wall space with 10 pieces. You could definitely do it cheaper with more vintage finds or mass-produced pieces, or spend way more with all artisan work.
Common Mistakes I See Constantly
Hanging everything at the same height in a straight line. This works for a specific modern minimalist look but for most spaces it’s boring. Vary the heights, create movement.
Not considering the wall color. Light colored pottery can disappear against white walls. You need contrast or nothing stands out. This seems obvious but I’ve watched people hang cream colored plates on cream walls and then wonder why it looks invisible.
Overcrowding the space. More isn’t always better. I’ve pulled pieces OUT of arrangements more often than I’ve added them. Negative space matters—it gives your eye places to rest and makes each piece feel more important.
Using cheap command strips for heavy pieces. I know they say they hold certain weights but in my experience they fail with heavier pottery, especially in humid environments or temperature fluctuations. Just use proper anchors.
Okay so that’s basically everything I’ve learned through way too much trial and error. The main thing is just start with a few pieces and build from there rather than trying to create the perfect arrangement all at once. You can always add more later and honestly the collection will evolve as you find pieces you love anyway.