Wall Art Guide, Wall Art Tutoriels
3D Plaster Wall Art: Raised Relief Sculptural Designs

Mar
So I’ve been working with plaster wall art for like three years now and honestly it’s one of those things that looks way more complicated than it actually is. My client last month wanted this whole textured accent wall and I was like okay let’s figure this out properly because I’d messed up before using the wrong materials.
The Plaster Types You Actually Need to Know About
Okay so first thing, not all plaster is the same and this confused me for SO long. You’ve got joint compound which is what most DIYers start with because it’s at Home Depot and cheap. It works but it’s gonna shrink and crack if you go thicker than like half an inch. I learned this the hard way on my own hallway wall and had to redo the whole thing.
Then there’s plaster of Paris which sets FAST. Like you have maybe 20 minutes before it’s rock hard. I use this for smaller detailed pieces where I’m doing like botanical imprints or geometric patterns. You mix it thicker than pancake batter, thinner than peanut butter if that makes sense.
The real MVP though is venetian plaster or lime plaster. It’s more expensive but you can build up layers and it doesn’t crack the same way. I buy the Behr Venetian Plaster from Home Depot most of the time because it’s like $40 a gallon and covers way more than you’d think. For bigger sculptural pieces I’ll spring for authentic lime plaster from a specialty supplier but honestly unless you’re doing a whole room the Behr works fine.
Joint Compound Hacks
If you’re gonna use joint compound anyway because budget or whatever, get the lightweight all-purpose kind. Mix in some white glue, maybe 10% of your total volume. My contractor friend told me this and it genuinely helps with the cracking issue. Also add water super slowly because you want it thick enough to hold shape but not so thick it won’t spread.
Tools That Actually Matter
You don’t need fancy stuff but you do need the RIGHT stuff. I wasted so much money on decorative trowels that looked cool but were useless.
Here’s what’s in my kit:
- Flexible putty knives in 3 sizes – 2 inch, 4 inch, and 6 inch
- A straight edge trowel for smoothing
- Plastic drop cloth because this gets messy
- Spray bottle with water
- Those cheap foam brushes for blending
- Silicone molds if you’re doing repeated patterns
- A actual level because eyeballing it leads to wonky designs
The silicone molds are kinda game-changing. You can get them on Amazon for like $15 and they’ve got florals, geometric shapes, all that. Press plaster into the mold, let it set for 10 minutes, pop it out and stick it to your wall with more plaster as adhesive. Way easier than trying to sculpt freehand if you’re not confident.
Prep Work Nobody Talks About
This is gonna sound boring but you gotta prep the wall properly or everything falls off eventually. I had a piece fall off a client’s wall at 2am once and she texted me a photo and I wanted to die.
Sand your wall lightly with 120 grit sandpaper. Wipe it down with a damp cloth. Then – and this is important – use a primer. I like Zinsser Gardz Problem Surface Sealer because it works on basically everything and helps the plaster grip. Let it dry completely, like give it 4 hours even though the can says 2.
If you’re going over existing paint that’s glossy you HAVE to sand it or use a bonding primer. The plaster won’t stick to glossy paint no matter what YouTube tells you.
Design Planning
Okay so you need some kind of plan unless you’re just doing random texture which is valid. I sketch directly on the wall with pencil. For geometric stuff I use painters tape to mark out sections.
For organic designs like waves or botanicals I’ll sometimes project an image onto the wall at night with my laptop and trace the general shapes. This sounds extra but it works really well and my cat loves attacking the projected image which is distracting but cute.
Actually Applying the Plaster
Start with a base layer that’s thin, like maybe 1/8 inch. This is your foundation. Use your trowel at like a 30 degree angle and spread it smooth. Don’t worry about making it perfect because you’re building on top of it anyway.
Let that dry at least 4 hours. Overnight is better if you have the patience which I usually don’t but whatever.
For the raised relief parts, this is where it gets fun. You’re basically building up the design in layers. I’ll do maybe 3-4 layers for something that’s got real dimension. Each layer needs to dry before the next or it just smooshes together into a blob.
Techniques That Work
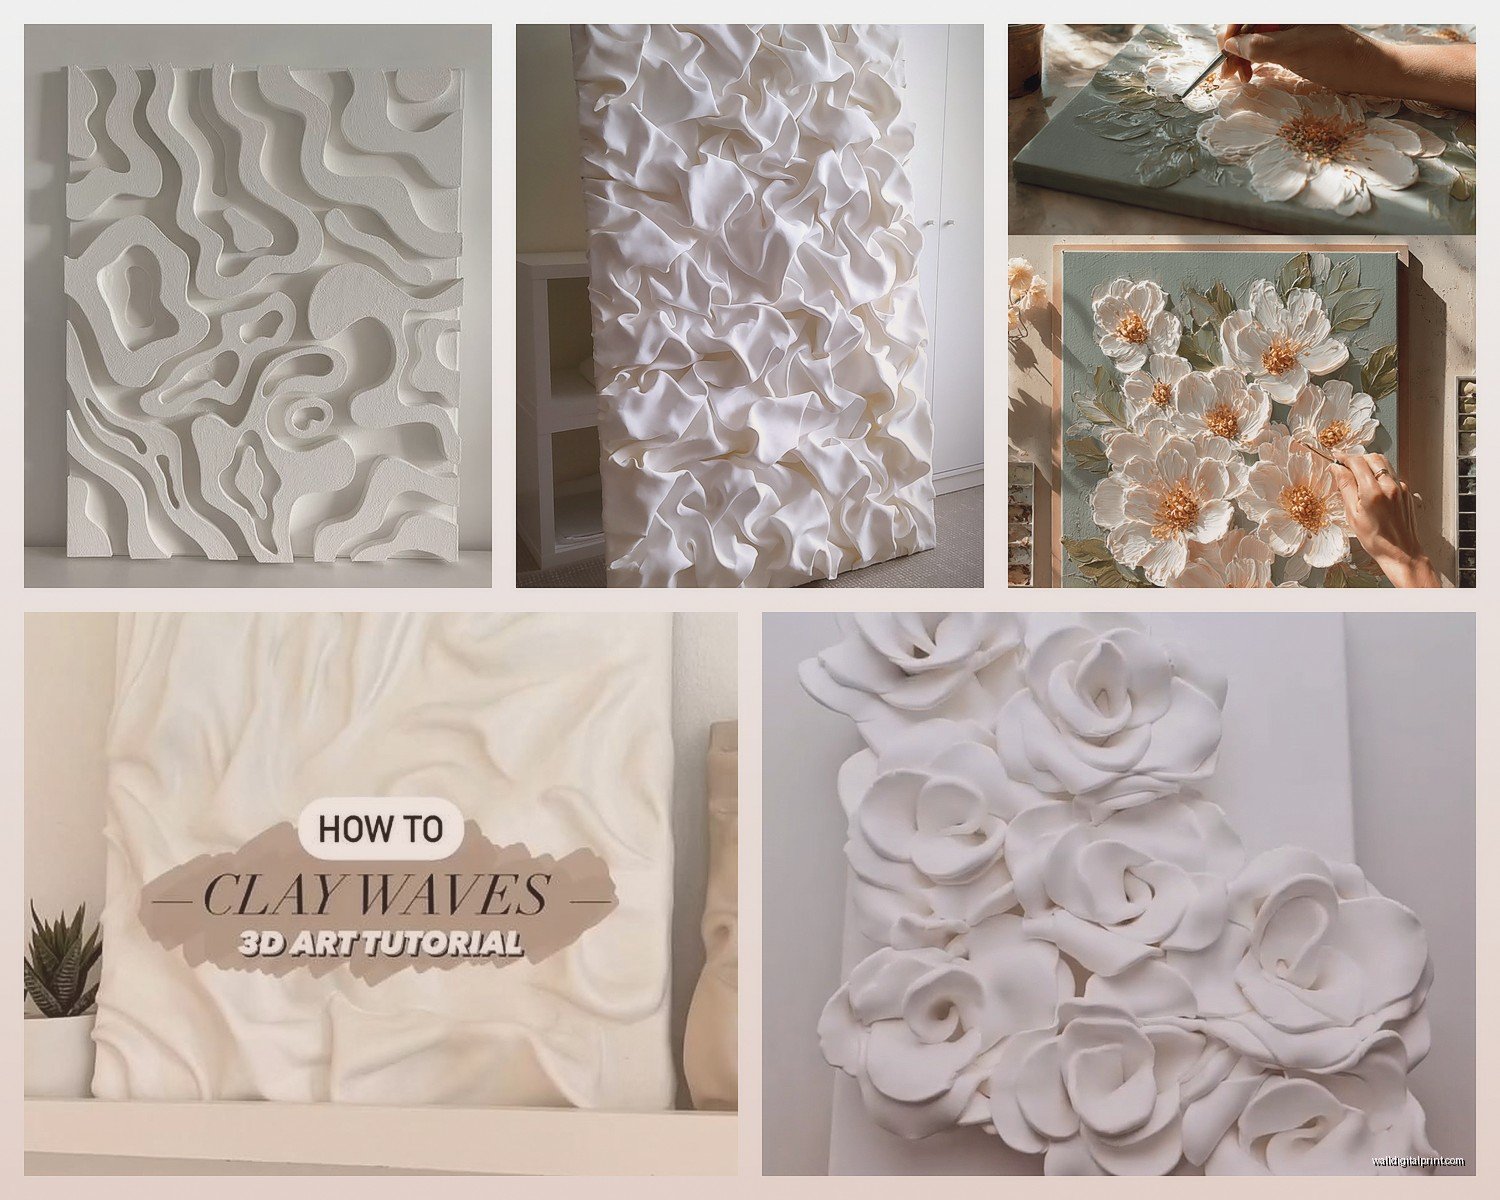
The stamping method: Press objects into wet plaster to create texture. I’ve used leaves, lace, crumpled plastic, those foam texture rollers. You want the plaster thick enough to hold the impression but wet enough that the object doesn’t stick permanently. Spray your object with water first.
Piping technique: Put plaster in a plastic bag, cut the corner, and pipe it like frosting. This works amazing for line designs, geometric patterns, writing. The plaster needs to be toothpaste consistency. I did a whole abstract line design above a client’s bed this way and it took forever but looked incredible.
Palette knife sculpting: This is for more organic shapes. You literally sculpt it like clay while it’s still workable. Keep your spray bottle handy because if it starts drying you can mist it lightly to keep working. I do a lot of wave patterns and flowing designs this way.
Additive method: Make small elements separately, let them dry completely, then attach them to the wall with fresh plaster. This is less stressful because you can work on pieces at your kitchen table and not standing on a ladder.
Problem Solving Real Issues
Cracking happens. If you get small cracks after drying, mix plaster thinner and work it into the cracks with your finger. Smooth it out and let it dry. For bigger cracks you messed up somewhere – probably too thick too fast or didn’t let layers dry.
Bubbles in your plaster mean you mixed it too vigorously. Mix slow and steady, don’t whisk it like eggs. If you get bubbles, pop them with a pin before it starts setting.
If pieces are falling off, your wall prep was bad or you didn’t let the base layer dry. Sorry but you gotta redo it. I know it sucks.
The Drying Process
This takes FOREVER and you gotta be patient. Thin layers dry in like 2-4 hours. Thick sculptural stuff can take 24-48 hours. Don’t rush it. I’ve rushed it. Everything goes wrong when you rush it.
You’ll know it’s dry when it’s completely uniform in color. Wet plaster is darker. Also it’ll feel cool to the touch while it’s still drying because of moisture evaporation.
Finishing and Sealing
Once everything is bone dry – like wait an extra day to be safe – you need to seal it. Unsealed plaster absorbs moisture and gets gross and can grow mold which is nightmare fuel.
I use either a clear acrylic sealer or wax. The acrylic sealer is easier, just roll it on with a foam roller. Two coats minimum. It’ll darken the plaster slightly but protects it really well. I use Polycrylic in matte finish usually.
Wax is more traditional and gives this beautiful subtle sheen. You apply it with a cloth, let it dry, then buff it. It’s more work but looks more authentic if you’re going for that venetian plaster vibe. The wax I use is Minwax Paste Finishing Wax.
Painting Your Plaster
You can totally paint plaster art. I do this a lot actually. Let the plaster dry completely, then use acrylic paint. You can paint the whole thing one color, or get fancy with it.
Here’s what I do for a really cool effect: paint the whole thing a dark color like charcoal or navy. Let it dry. Then dry brush a lighter color like white or cream over the raised areas. The dark color stays in the recessed parts and creates tons of dimension. It’s so easy but looks professional.
Metallic paints work great too. I did a geometric design in gold and it looked way more expensive than it was. Just make sure you seal over the paint when you’re done.
Design Ideas That Work
Okay so if you’re stuck on what to actually make, here’s what I’ve done that people love:
Abstract organic shapes: Think like topographic map lines or flowing water patterns. These are forgiving because there’s no wrong way to do them. Just build up layers in flowing lines and curves.
Geometric panels: Use tape to section off rectangles or triangles, fill them with texture. Super modern looking and easier than it seems.
Botanical impressions: Press actual leaves or flowers into plaster, remove them, you’ve got nature prints. I did a whole wall of fern impressions and it was stunning.
Minimalist line art: Just simple raised lines forming a face or figure or whatever. Very trendy right now. Use the piping method for this.
Textured panels behind floating shelves: Smaller commitment but still impactful. Just do like a 2×3 foot section with texture.
Where to Use This Stuff
Not every wall is a good candidate. High humidity areas like bathrooms need really good sealing or the plaster gets weird. I’ve done it in bathrooms but I seal the hell out of it with multiple coats and use a water-resistant sealer.
Best spots:
- Above beds as a headboard alternative
- Dining room accent walls
- Entry ways for impact
- Behind open shelving
- Fireplace surrounds if it’s not directly over the heat source
Don’t do it in kids rooms where they’re gonna pick at it. Kids will 100% pick at raised plaster and destroy your work. Voice of experience here.
Cost Breakdown Reality Check
For a medium sized project like a 4×6 foot accent wall, you’re looking at maybe $80-150 in materials if you’re using mid-range stuff. That includes plaster, sealer, tools if you don’t have them.
Time-wise, plan for a weekend project minimum. Application might take 6-8 hours spread over two days, then drying time, then sealing.
If you mess up, joint compound is cheap enough that you can scrape it off and start over. Don’t do this with expensive lime plaster though, you’ll cry.
Common Mistakes I Made So You Don’t Have To
Working too fast. Seriously the biggest mistake. Let things dry.
Making the design too complex for my skill level on my first try. Start simple, get fancy later.
Not having enough plaster mixed. You don’t want to stop in the middle to mix more because the edge will dry and you’ll see the seam. Mix extra.
Using the wrong consistency. Too wet and it runs, too thick and it won’t spread or stick properly. It takes practice to get the feel for it.
oh and another thing – wear clothes you don’t care about because plaster gets EVERYWHERE. Like I found it in my hair hours later once and I don’t even know how.
The satisfying part is when you step back after everything’s done and sealed and catch the light hitting those raised areas just right. Makes all the patience worth it honestly.