Wall Art Guide, Wall Art Tutoriels
Wicker Wall Art: Rattan Basket Weave Designs
Mar
So I’ve been obsessed with wicker wall art lately and honestly it started because I bought this massive rattan basket at a flea market thinking it’d be perfect for blankets but then it just sat there looking sad in the corner for like three months. Anyway, I ended up mounting it on the wall and everyone who came over was like “where’d you get that” and now I’m basically the wicker wall person among my friends.
The Basic Materials You Actually Need
Okay so first thing – rattan and wicker aren’t exactly the same thing and I didn’t know this until embarrassingly recently. Rattan is the actual material (it’s a vine-type palm), wicker is the weaving technique. But everyone just calls everything wicker so whatever, I do too.
For mounting these things you’re gonna need:
- Heavy duty picture hanging strips if you’re renting (the Command ones rated for like 16 pounds)
- D-ring hangers and screws if the basket doesn’t have them already
- A level because eyeballing it is how you end up with a crooked basket that’ll haunt you forever
- Wire cutters if you’re planning to cut baskets apart – which sounds crazy but wait I’ll explain
- Sandpaper (medium grit) for any rough edges
- Clear spray sealant if you’re putting them anywhere humid
Where to Source Wicker Pieces That Don’t Look Generic
This is gonna sound weird but the best wicker pieces I’ve found have been at estate sales and honestly… behind grocery stores? Like those Asian markets sometimes have the BEST bamboo and rattan trays they’re literally throwing away. I grabbed three last month and my husband was mortified but they’re now in a client’s dining room and she paid me actual money for them.
Thrift stores are obvious but go on weekdays. The good stuff gets snatched on weekends. I look for:
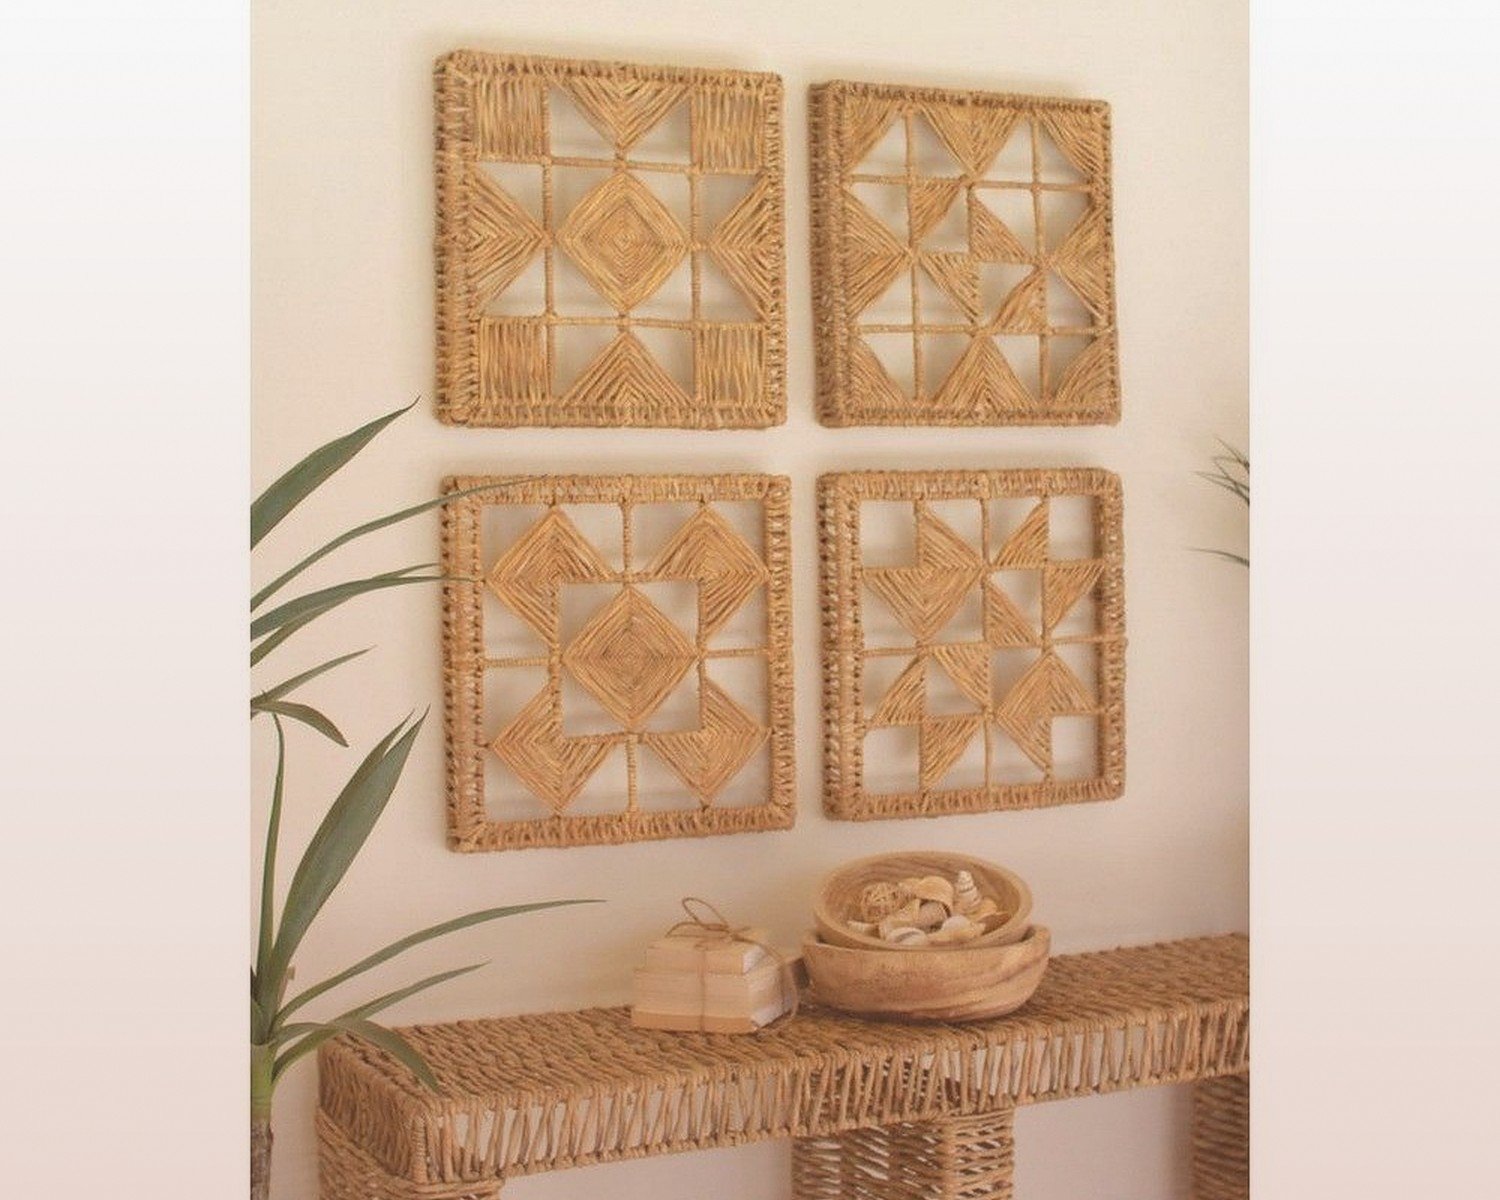
- Flat baskets and trays (instant wall art, basically)
- Broken wicker furniture – sounds counterintuitive but the woven backs of chairs are perfect
- Rice winnowing baskets (they have the coolest spiral patterns)
- Vintage sewing baskets with interesting lids
- Those shallow fruit baskets from the 70s
Online, I’ve had good luck with Etsy for vintage pieces and honestly Amazon for basic round rattan plates if you need like six matching ones for a gallery wall situation. There’s this seller called… wait let me check my orders… okay I can’t find it but search “natural rattan wall plate” and look for the ones that are actually woven, not the printed fake ones.
Preparing Your Pieces
So here’s what I learned the hard way – you gotta clean these things really well before hanging them. Old wicker is basically dust city. I use a soft brush attachment on my vacuum first, then wipe down with a barely damp cloth. If it’s really gross (estate sale finds usually are), mix a tiny bit of dish soap with water but seriously BARELY damp because too much water can warp the weave.
Let everything dry completely for like 24 hours. I once rushed this and the basket got moldy on the wall which was… not cute.
If you’re working with vintage pieces that smell musty, leave them outside for a day or spray with a mix of vodka and water. My cat knocked over my vodka bottle last week so I can’t do this anymore but it really works.
Cutting and Modifying Baskets
Okay so funny story – I was watching The Great British Baking Show and saw this basket on the counter and realized you could totally cut wicker baskets in half to create these really cool dimensional pieces. You need good wire cutters because there’s usually wire running through the rim.
Cut slowly and wear safety glasses because little pieces fly everywhere. After cutting, you’ll have sharp wire ends so either:
- Fold them back with pliers and cover with hot glue
- Sand down the entire edge
- Wrap the edge with jute rope which actually looks intentional
I’ve cut round baskets in half to make rainbow shapes, trimmed down basket lids, separated tiered baskets into individual pieces. The possibilities are kinda endless once you stop thinking of them as functional objects.
Hanging Methods That Actually Work
The biggest question I get is how to hang these without putting holes in the wall because most people are renters now apparently.
For lightweight pieces (under 3 pounds), those Command picture hanging strips work fine. Use two strips even if the package says one is enough – trust me. Press them onto the wall for like 30 seconds, I usually set a timer because otherwise I definitely don’t hold long enough.
For heavier baskets, you gotta use hardware. Most wicker pieces don’t come with hanging mechanisms so you’re adding them yourself:
D-Ring Method
This is my go-to. Get two D-ring hangers from the hardware store (like 50 cents each). Position them about 1/3 down from the top of the basket, one on each side. Screw them into the wicker – it goes through pretty easily but drill a tiny pilot hole first if the material seems brittle.
Then you’re hanging it on two nails or screws in the wall. Use a level to mark where the nails go. Measure the distance between your D-rings, transfer that measurement to the wall, double-check with the level, then nail.
Wire Hanging Method
For round baskets or plates, I thread picture hanging wire through the weave itself. Go through the back, across, and back out, then twist the wire ends together. This sits flush against the wall which looks cleaner than D-rings for flat pieces.
You can hang this on a single nail but make sure it’s rated for the weight. I use those brass picture hanging nails – they’re thin so they don’t leave huge holes but they’re surprisingly strong.
Creating Arrangements That Don’t Look Random
So my client canceled yesterday and I spent like an hour comparing different basket arrangements on my living room wall and here’s what I figured out:
Odd numbers work better than even. Three baskets, five baskets, seven if you have a huge wall. Something about odd numbers feels more natural.
Mix sizes but keep the style consistent. Like all flat woven pieces, or all three-dimensional baskets, or all the same color tone. If you mix too many different styles it looks like you just stuck up everything you found at the thrift store… which you did, but we don’t want it to LOOK like that.
Gallery Wall Layout
For a gallery wall situation, I lay everything out on the floor first. Take a photo from above so you remember the arrangement. The biggest piece usually goes slightly off-center – dead center can look too formal.
Keep 2-4 inches between pieces. Closer than 2 inches looks crowded, more than 4 inches and they stop feeling like a collection.
I use painter’s tape on the wall to mark where each piece goes. Trace the basket on paper, cut it out, tape the paper to the wall, step back, adjust, adjust again, then finally commit to nailing.
Color and Finish Options
Natural is obviously easiest but sometimes you want color. I’ve experimented with painting wicker and here’s the thing – it takes SO MUCH PAINT because the weave is absorbent and three-dimensional.
Spray paint works better than brush-on. Do light coats, let it dry between coats, expect to use at least 2-3 cans per basket depending on size. Rustoleum 2X coverage is my preferred brand.
Colors that work well:
- Matte black (very graphic, shows off the texture)
- Soft white (beachy, casual)
- Terracotta or rust (trending right now, warm)
- Deep green (surprisingly good, earthy)
Don’t use glossy finishes – they look plastic-y on natural materials.
Wait I forgot to mention – if you’re keeping things natural, you can still vary the tones. Rattan ranges from pale honey to dark brown. Mixing different natural tones in one arrangement adds depth without color.
Sealing and Protecting
For bathrooms or humid areas, seal everything with a clear matte sealant. I use Minwax Polycrylic in matte – do two coats. This prevents moisture absorption which leads to mold or warping.
In dry climates you don’t really need sealant unless the piece is super old and brittle. Then a light coat helps hold everything together.
Styling Different Rooms
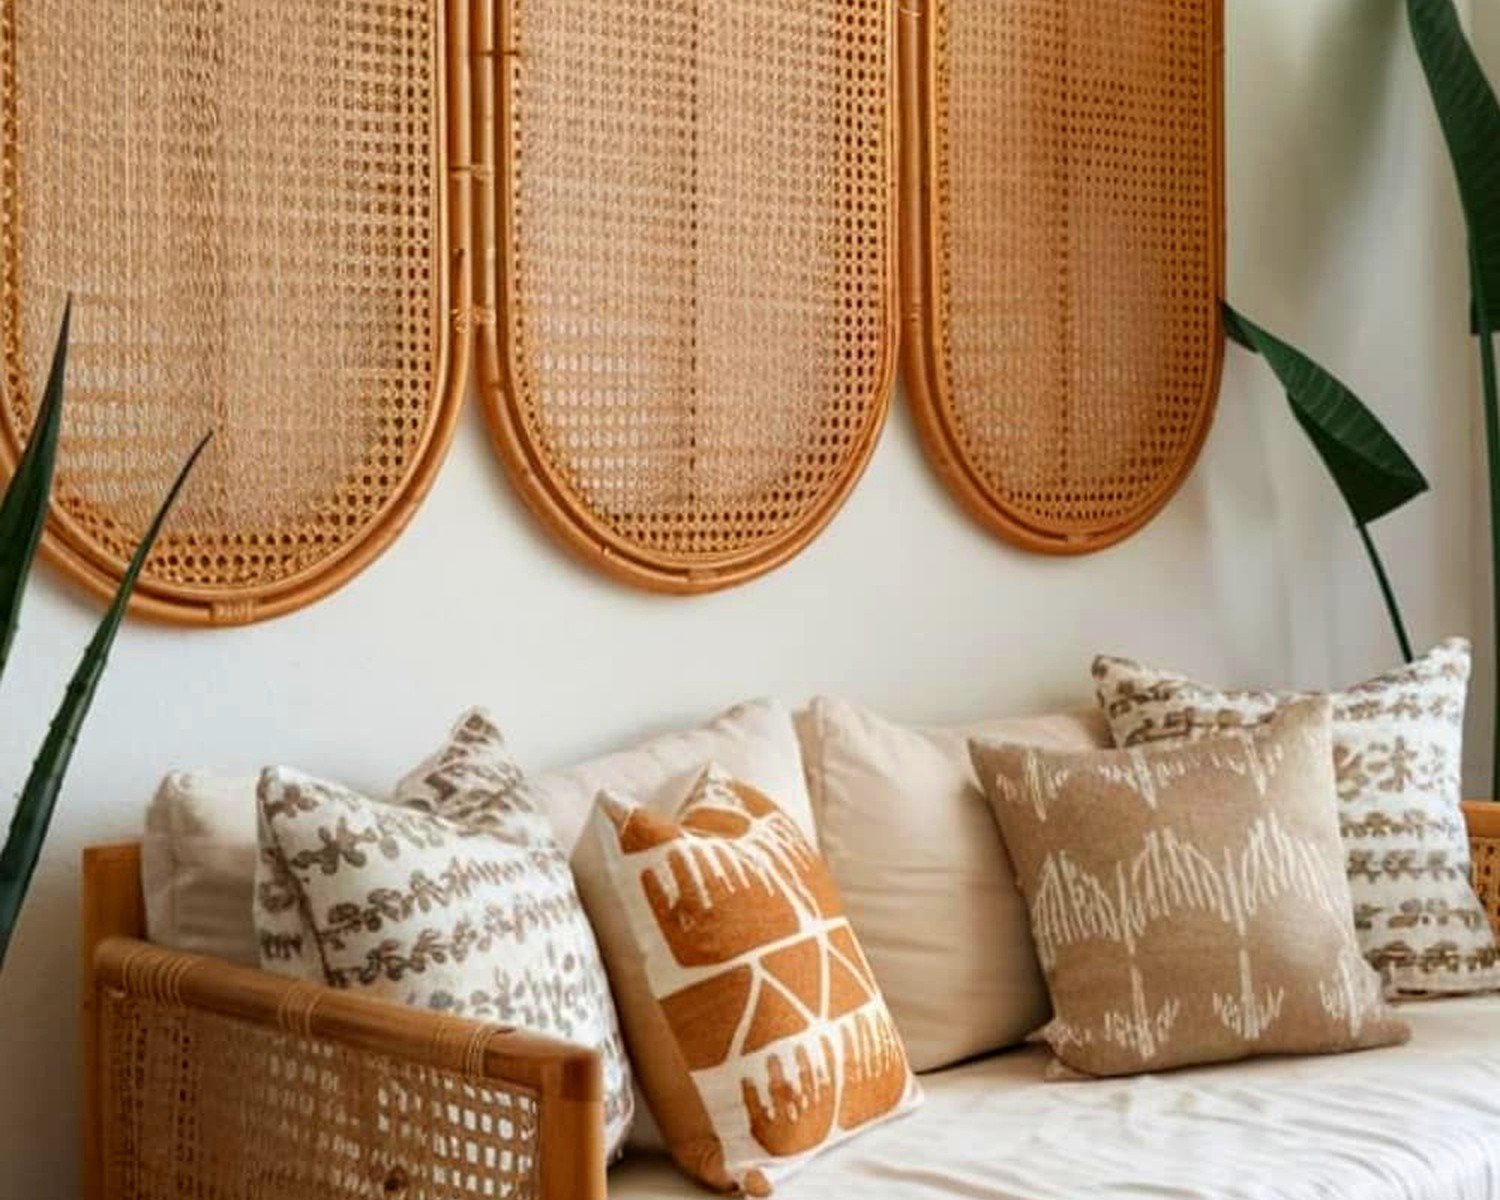
Living rooms: Go big. One statement basket (like 24+ inches) or a collection of 5-7 varied sizes. I did a client’s living room with basket wall art behind the sofa and it added so much texture without competing with her colorful pillows.
Bedrooms: Above the bed is obvious but also consider flanking a mirror with matching baskets. Creates symmetry which feels calming in a bedroom.
Dining rooms: Smaller baskets in a grid pattern looks really clean. I did nine matching 8-inch rattan plates in a perfect grid and it’s giving modern farmhouse without being too… you know… farmhouse-y.
Bathrooms: Only if you seal them well. Smaller pieces work better in bathrooms because the walls are usually broken up by mirrors and fixtures.
Common Problems and Fixes
Basket won’t hang straight: The weave is uneven so the weight distribution is off. Add a small stick-on furniture pad to the back on whichever side tilts up. Sounds janky but it works.
Wicker is shedding/falling apart: Spray with hairspray or clear sealant to hold loose pieces. For actual broken sections, I’ve used hot glue on the back where it doesn’t show.
Color doesn’t match your space: Light stain can darken natural wicker. I’ve used Minwax wood stain (just wipe on, wipe off) to adjust tones. Test on the back first.
It looks too rustic/farmhouse: Mix with modern elements. A wicker basket next to a brass sconce and abstract art reads totally different than the same basket with buffalo check and galvanized metal.
Maintenance
Dust regularly with a microfiber duster or vacuum attachment. That’s basically it. Wicker is super low maintenance which is why I love it.
Every few months, check that the hanging hardware is still secure. The wicker can compress slightly over time which loosens screws.
If you painted pieces, they might need touch-ups eventually especially in high-traffic areas where people brush against them.
Budget Breakdown
You can do this really affordably or spend a lot – it’s pretty flexible.
Budget option: Three thrift store baskets ($2-5 each), D-rings and hardware ($3), picture hanging strips ($5). Total around $20 for a decent arrangement.
Mid-range: Mix of vintage finds and new rattan plates from Amazon ($15-30 each), proper hanging hardware, maybe paint. Around $75-100 for a statement wall.
Investment: Vintage woven wall hangings from Etsy or antique stores can run $50-200+ each but they’re actual art pieces. I have a client who spent $400 on a vintage African basket and it’s the focal point of her entire entryway.
The nice thing is you can start small and add pieces over time. I’ve been building my personal collection for like two years now and I’m still finding pieces.
Oh and another thing – check Facebook Marketplace and Craigslist for people selling wicker furniture. Sometimes you can get a whole peacock chair for $20 and harvest the woven back panel which is basically free wall art if you’re willing to dismantle furniture… which I clearly am based on the pile of chair pieces in my garage right now.