Wall Art Guide, Wall Art Tutoriels
Mirror Wall Art: Reflective Decorative Glass Designs
Mar
So I’ve been working with mirror wall art for like six years now and honestly it’s one of those things where you think it’ll be simple but then you’re standing in a store holding two different pieces wondering why one costs $50 and the other is $400 and they look basically the same.
First thing – and I learned this the hard way after a client’s “antique” mirror literally fell apart three months after installation – you gotta understand what you’re actually buying. There’s regular mirror glass, which is your standard bathroom mirror situation. Then there’s decorative mirror which can mean like ten different things depending on who’s selling it.
The Actual Materials You Need to Know About
Regular silver-backed mirror is what most people think of. It’s glass with a silver coating on the back, then protected with copper and paint layers. This is your reliable workhorse. Not fancy but it works and lasts forever if you treat it right.
Then there’s antiqued or distressed mirror which is having a moment that’s lasted like a decade now. They basically damage the silver backing on purpose to create that spotted vintage look. Some companies use chemicals, some literally scrape it off. I watched a artisan do this once and it’s weirdly satisfying but also you realize you’re paying someone to strategically ruin a perfectly good mirror.
Bronze or tinted mirror comes with the metallic coating in different colors – bronze, gold, rose gold, grey, even blue. The glass itself might be tinted too. I used a bronze mirror in my own hallway and the warmth it adds is completely different from regular silver mirror. Changes the whole vibe.
Beveled vs Non-Beveled Edges
Okay so beveled edges are when they grind and polish the edge of the mirror at an angle. Creates this elegant border effect that catches light. Traditional and classic looking. Non-beveled is just a straight cut edge – more modern and minimal.
Here’s what nobody tells you: beveled edges are stronger. That angled cut actually makes the edge less likely to chip. But they also cost more because it’s extra labor. For wall art specifically, I usually go beveled unless we’re doing a really contemporary geometric thing where straight edges make more sense.
Quality Differences That Actually Matter
This is gonna sound weird but the backing matters SO much. Cheap mirrors use this thin paint layer that flakes off if you look at it wrong. Better mirrors have multiple protective layers. You want copper sulfate as the first protective layer over the silver, then quality paint sealing everything.
I once had this whole situation where a client bought these gorgeous sunburst mirrors from some Instagram ad and within six months the backing was peeling and the edges were corroding. Moisture got in because the seal was garbage. We ended up replacing all five of them and I felt so bad because I should’ve checked them first.
The glass thickness matters too. Standard is 3mm to 6mm. Anything under 3mm is gonna feel flimsy and cheap. For wall art I usually spec 4mm minimum. If it’s a large piece like over 30 inches, go for 6mm because the weight distribution is better and it won’t warp.
Frame Materials for Mirror Wall Art
Wood frames are classic and you can get them in every finish imaginable. Look for solid wood or quality wood composite. That MDF stuff wrapped in vinyl looks okay at first but it chips and peels. I learned this when my cat knocked over a leaning mirror and the frame corner just… crumbled. Solid wood would’ve just gotten a dent.
Metal frames – usually aluminum, steel, or brass. Aluminum is lightweight which is nice for hanging but can look cheap if it’s not finished well. Steel is heavier but more substantial feeling. Brass or gold-tone metal is everywhere right now and I’m not mad about it but make sure it’s actually sealed or it’ll tarnish.
Frameless mirrors are having their moment too. Clean and modern but you need proper mounting hardware because there’s nothing to distribute the weight. The edges should be polished smooth – run your finger along it in the store, you shouldn’t feel any sharpness.
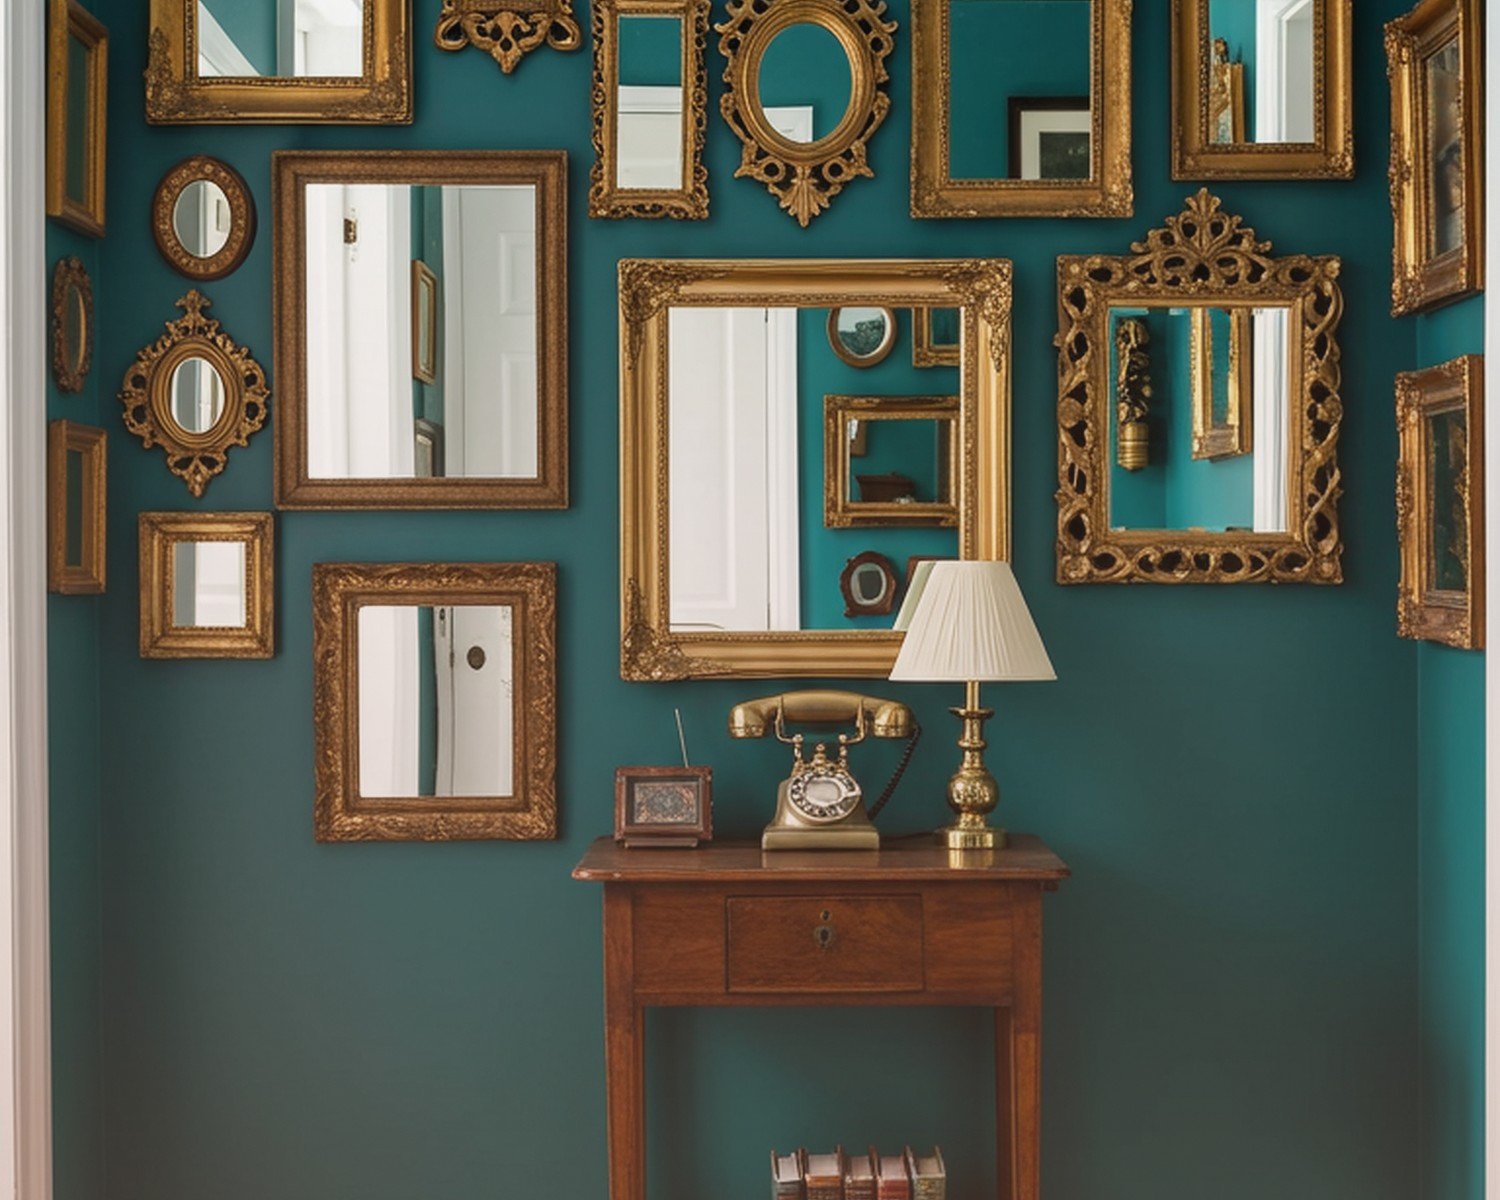
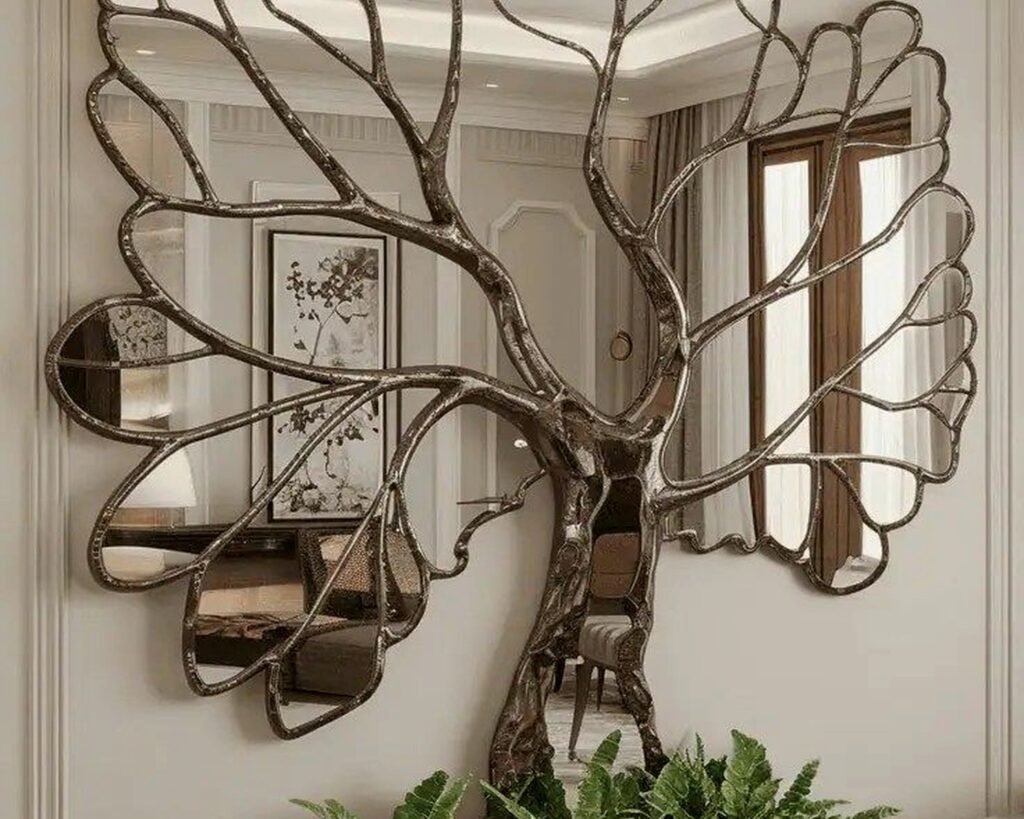
Types of Mirror Wall Art You’ll Actually See
Sunburst mirrors are that starburst design, usually metal rays coming out from a center mirror. Been popular since like the 1950s and keep coming back. They range from $40 at Target to $800 at fancy boutiques. The difference is usually in the metal quality and how the rays are attached. Cheap ones have rays that wobble or fall off.
Geometric mirror sets are those arrangements of hexagons, diamonds, or abstract shapes. Super trendy right now. You stick them on the wall in a pattern you create. They’re usually 3mm acrylic mirror or thin glass. The acrylic ones are lighter and safer but they scratch easier and don’t reflect as clearly as real glass.
Wait I forgot to mention – acrylic mirror is basically reflective plastic. It’s shatter-resistant which is great for kids’ rooms or high-traffic areas. But it distorts the reflection slightly and scratches if you breathe on it wrong. I use it for clients with small children but otherwise I prefer real glass.
Venetian-style mirrors are those ornate ones with decorative etched or beveled mirror borders. Traditional and fancy. Real Venetian mirrors from Murano are insanely expensive and honestly unless you’re really into it, the modern reproductions look almost identical. I’ve seen both side by side and yeah the antique has more character but the $200 reproduction from a good manufacturer is gonna make most people just as happy.
Mosaic and Multi-Panel Designs
These are multiple mirror pieces arranged together, either with gaps between them or fitted closely. Could be all the same shape or mixed. The installation is more complex because you’re hanging multiple pieces and they need to line up properly.
I did this whole living room wall last month with like 20 different sized rectangular mirrors in a grid pattern and it took FOREVER to get the spacing right. But it looks incredible and the light reflection is amazing because you get these multiple angles bouncing light around.
Convex or concave mirrors have curved surfaces. Convex bulges out and makes reflections smaller – that fisheye effect. Concave curves inward and magnifies. They’re more decorative than functional but create really interesting visual effects. Usually more expensive because curved glass is harder to manufacture.
What to Look For When You’re Actually Shopping
Check the back of the mirror if you can. Should have proper backing material, not just exposed silver coating. Look for a moisture barrier especially if you’re putting it anywhere near a bathroom or humid area.
Inspect the edges carefully. Sharp edges mean poor quality control. Chips or roughness at the edge will eventually spread into cracks. Run your finger along it – should be smooth whether it’s beveled or not.
Look at the reflection straight on and from an angle. Any waviness or distortion means the glass isn’t flat or the backing is uneven. This is really common in cheaper mirrors and it drives me crazy because you don’t always notice it in the store but once it’s on your wall you can’t unsee it.
If it has a frame, check how the mirror is secured. Should be really firmly attached with proper brackets or adhesive, not just sitting in there. I’ve seen frames where the mirror can shift around inside and that’s a disaster waiting to happen.
Hardware and Hanging Systems
D-rings on the back are common and work fine for smaller pieces. They should be screwed into the frame really securely, not just those tiny nails.
Wire hanging is traditional but I’m honestly not a huge fan for anything heavy. The wire can stretch over time and the mirror ends up hanging crooked. If you do use wire, make sure it’s proper picture hanging wire rated for the weight, not just random wire.
French cleats are my favorite for larger mirror art. It’s a mounting system where one piece attaches to the wall and another to the back of the mirror, and they lock together. Super secure and you can adjust side to side before you let it drop into place.
Keyhole hangers work for medium-weight pieces. They’re those slots on the back that fit over screws in the wall. Make sure there are at least two of them for balance.
Installation Stuff Nobody Mentions
Okay so funny story, I was hanging a 40-pound mirror by myself because my assistant called in sick, and I’m standing there holding this thing against the wall trying to mark where the screws go and my dog starts barking at the mailman and I almost dropped the whole thing. Get help for anything over 20 pounds, seriously.
Use the right wall anchors for your wall type. Drywall needs proper anchors rated for the weight. I like toggle bolts for anything heavy. If you can hit a stud, even better. For plaster walls, you need special anchors that won’t crack the plaster.
Mark your hanging height carefully. Eye level is usually around 57-60 inches to the center of the mirror, but it depends on your ceiling height and furniture placement. I’ve moved mirrors three times because the height just felt wrong even though technically it was correct.
Level is non-negotiable. Even slightly crooked drives me insane and everyone who visits will notice it. Use a real level, not the app on your phone – those aren’t accurate enough.
Cleaning and Maintenance
Regular glass cleaner is fine for most mirrors but avoid anything with ammonia if you have an antiqued finish because it can damage the distressing. I usually just use water with a tiny bit of dish soap and a microfiber cloth.
The edges are where problems start. Moisture gets in at the edges and causes the backing to deteriorate. If you’re hanging mirrors in a bathroom, make sure there’s good ventilation and wipe down any moisture that accumulates.
For metal frames, dust regularly and use appropriate polish for the metal type. Brass and gold-tone finishes can tarnish if not sealed properly. I learned this when a client’s beautiful brass sunburst mirror turned greenish after a year in her humid bathroom.
Price Points and What You’re Getting
Under $50: Usually mass-produced with thin glass, basic backing, and simple frames. Fine for temporary decor or low-humidity areas. Don’t expect them to last more than a few years.
$50-$150: Better quality glass, more secure backing, nicer frame materials. This is the sweet spot for most people. Brands like Howard Elliott and Uttermost fall here and they’re generally reliable.
$150-$400: Higher quality everything – thicker glass, better protective coatings, solid wood or substantial metal frames, better hardware. Handcrafted details. This is where I shop for client projects most of the time.
Over $400: You’re paying for designer names, genuine antiques, handcrafted artisan work, or really large sizes. Sometimes worth it for a statement piece but honestly a lot of expensive mirrors aren’t that much better quality than the $200-300 range, you’re just paying for the brand.
Where to Actually Buy Them
HomeGoods and TJ Maxx have surprisingly good mirror art sometimes. You gotta dig and check quality carefully but I’ve found great pieces there. Just really inspect them because returns can be annoying.
West Elm and CB2 have good modern options. Pricier but consistent quality. Their website photos are usually accurate which is helpful.
Wayfair has everything but quality is all over the place. Read reviews carefully and check the return policy. I’ve gotten amazing pieces and absolute garbage from there.
Etsy is great for unique handmade stuff but ask questions about materials and get exact measurements. Artisan-made mirrors can be stunning but you gotta communicate clearly about what you want.
Estate sales and antique shops for vintage pieces. Bring a flashlight to check the backing condition and be prepared to have the mirror resilvered if the backing is deteriorating. Resilvering costs like $5-10 per square foot so factor that in.
Common Problems and How to Avoid Them
Black edges are caused by moisture getting behind the silver coating and causing it to oxidize. Prevention is way easier than fixing it. Keep mirrors away from direct water exposure and ensure good air circulation.
Cloudiness or haziness usually means the protective coating is failing or there’s moisture trapped between layers. Not really fixable – you need a new mirror.
Frame separation happens when the adhesive or brackets holding the mirror fail. This is why checking the construction before buying matters. A separated frame usually means the whole piece is toast unless you can reattach it securely.
My client canceled last week so I spent like an hour comparing antiqued mirrors at three different stores and the quality difference was shocking. Same price point but one had backing that was already peeling at the edges right there in the store. Trust your eyes and hands when inspecting these things.
The weight thing is real – I cannot stress this enough. A 30×40 inch mirror with frame can easily weigh 30-40 pounds. Make sure your wall can handle it and use appropriate hardware. I’ve seen mirrors pull right out of drywall because someone used those cheap plastic anchors.
Anyway that’s basically everything I’ve learned through trial and error and a few expensive mistakes. The key is really just checking quality carefully before you buy and not assuming expensive automatically means better. Some $100 mirrors outlast $400 ones if the materials and construction are solid.