Wall Art Guide, Wall Art Tutoriels
Floral Metal Wall Art: Sculptural Flower Bloom Designs
Mar
So I’ve been basically living and breathing metal floral wall art for the past three months because my studio apartment needed something that wasn’t just another canvas print, and honestly? The rabbit hole goes deep.
Material Types That Actually Matter
Okay first things first, not all metal is created equal and this matters way more than I thought it would. I made the mistake of buying this gorgeous rose piece from a random Etsy shop without asking about the metal type and it started rusting within like six weeks because apparently my bathroom has humidity issues.
Steel vs. Iron vs. Aluminum – here’s what you actually need to know. Carbon steel looks amazing, has that industrial vibe, but it will rust if you look at it wrong. Seriously. You need powder coating or some kind of sealant. I learned this the hard way. Iron is heavier, more traditional, gives you that wrought iron look but same rust issues. Aluminum though? That’s been my go-to lately because it’s lightweight (huge deal if you’re hanging multiple pieces), naturally rust-resistant, and way easier to work with if you’re doing any DIY modifications.
Copper and brass are having a moment right now and I get why. They develop this patina over time that actually looks intentional? My friend Sarah has this copper magnolia piece in her entryway and it’s darkened in the most beautiful way over two years. But heads up – if you want to keep that shiny penny look, you gotta seal it and even then you’re gonna be polishing it every few months.
Finish Options (This Gets Confusing)
The finish is where people get tripped up because the product photos online are basically lies half the time. What looks matte black in the listing shows up with this weird glossy sheen that catches every light wrong.
Powder coating is your friend. It’s baked on so it’s durable, doesn’t chip easily, and comes in basically any color. I have a powder-coated steel lotus piece above my couch that’s survived me bumping into it approximately seventeen times while vacuuming.
Raw metal finishes are trendy but high maintenance. You’re signing up for a relationship with mineral oil or wax if you go this route. Every couple months you gotta wipe them down, reapply whatever protective coating you’re using… it’s a whole thing. But man, they look good if you put in the work.
Painted finishes are hit or miss. Sometimes you get this beautiful hand-painted look with dimension and texture, other times it’s clearly just spray paint that’s gonna flake off. Ask sellers specifically about the paint type – automotive paint holds up way better than craft paint.
Design Styles and What Works Where
I’ve tested SO many different styles at this point because I might have a problem with online shopping when my cat wakes me up at 3am.
Abstract geometric florals are perfect if you’re going for modern or contemporary. Think clean lines, negative space, maybe some asymmetry. These work great in minimalist spaces because they add visual interest without overwhelming. I put a geometric peony piece in my client’s Airbnb and it photographs incredibly well – just sayin’ if that matters to you.
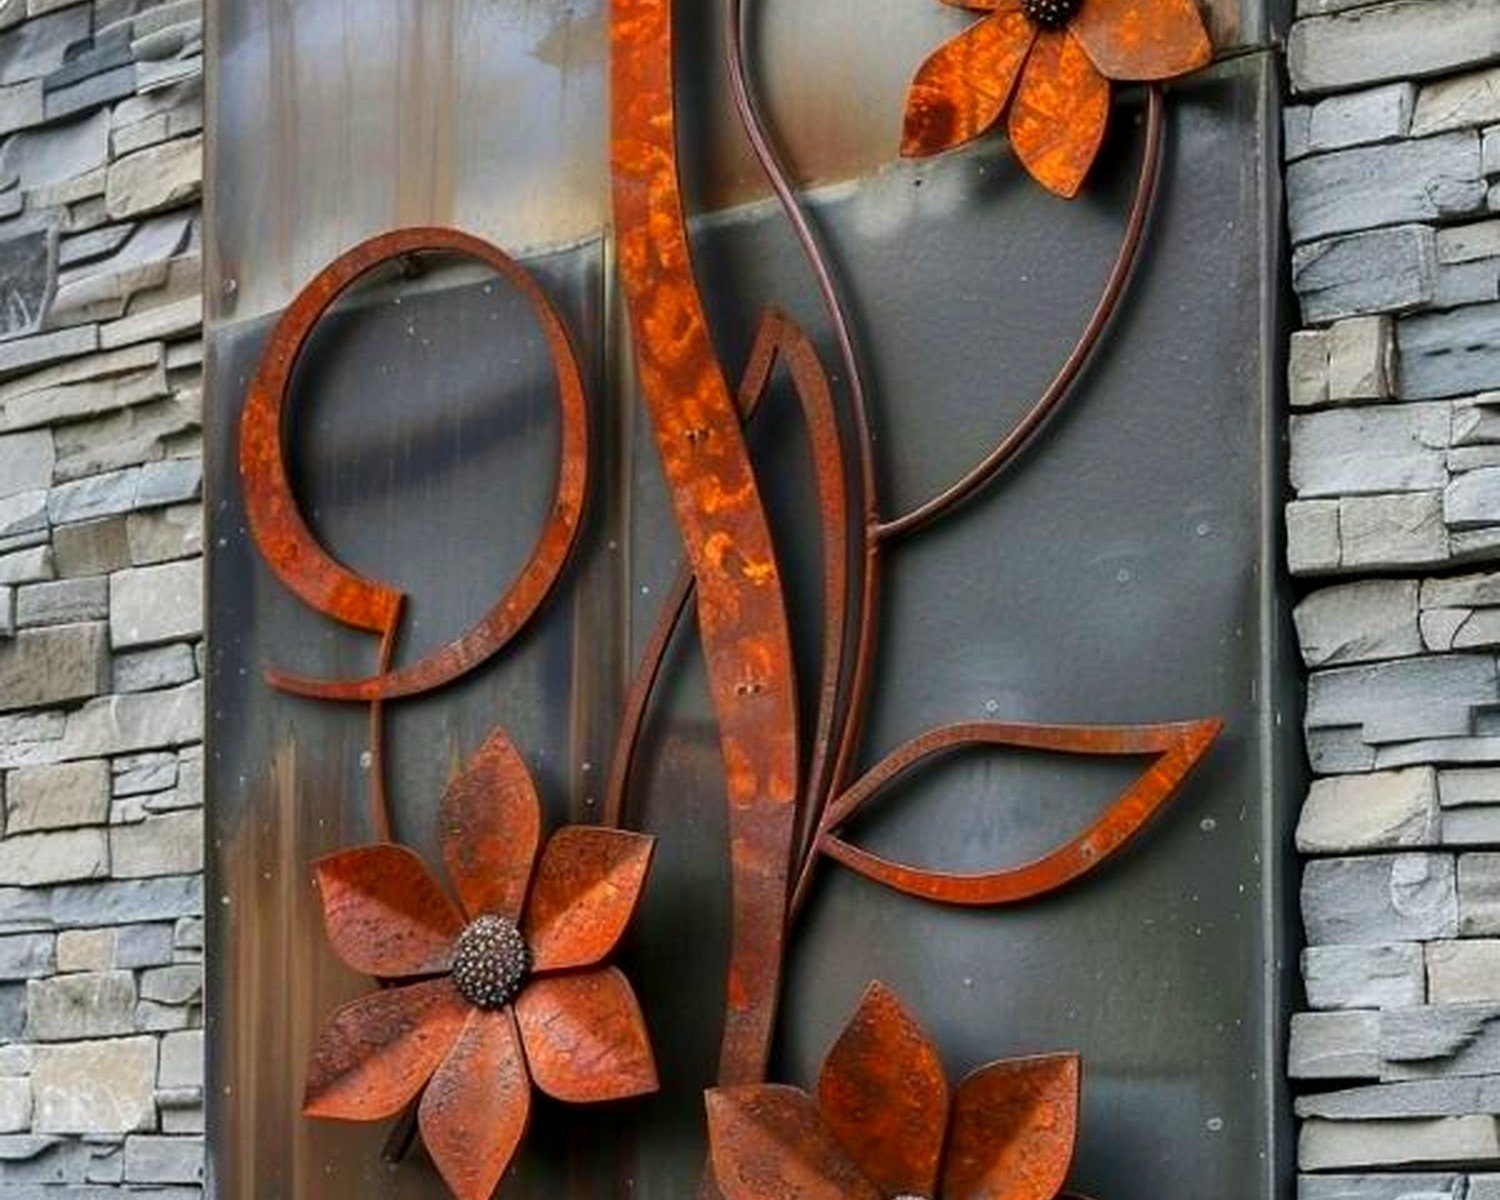
Realistic sculptural blooms with actual dimension and layers… these are statement pieces. They stick out from the wall sometimes 4-6 inches, which looks amazing but you gotta consider your space. I nearly took one to the face walking past it in a narrow hallway. Measure your clearance is what I’m saying.
The vintage wrought iron style with scrollwork and traditional flower shapes – roses, lilies, that sort of thing – these lean cottage core or farmhouse. They’re heavier usually, need solid anchors, but they have this timeless quality. My mom has had the same iron rose trellis piece for like twenty years and it still looks current.
Size Considerations Nobody Talks About
Here’s where I messed up initially: I ordered this beautiful cherry blossom branch piece that was listed as “large” which could mean literally anything. It arrived and was 14 inches. Fourteen. For a wall that’s 8 feet wide. Looked ridiculous.
For a standard wall (let’s say 8-10 feet wide), you want your focal piece to be at least 24-36 inches in at least one direction. Smaller pieces work better in groupings – like three or five pieces clustered together. Even numbers look weird for some reason, it’s just a design thing.
If you’re going above a sofa or bed, the piece should be roughly 2/3 the width of the furniture. I know that sounds specific but it’s the ratio that actually looks intentional. Anything smaller looks like it’s floating awkwardly, anything bigger overwhelms the furniture.
Weight and Hanging Hardware Reality Check
Okay so funny story, I used regular picture hanging hooks for a large dahlia sculpture and it literally fell off my wall at 2am and scared me so badly I thought someone broke in. Metal art is HEAVY, especially layered pieces with dimension.
What you actually need:
Toggle bolts for drywall if your piece is over 10 pounds (most sculptural ones are). Those plastic anchors from the hardware store? Forget it. They’ll hold for maybe a week before slowly pulling out of the wall. Been there.
If you can hit a stud, obviously do that. Use wood screws, make sure they’re going in at least 1.5 inches. I use a stud finder that I got for like $15 and it’s been worth every penny.
French cleats are amazing for really heavy pieces or if you want to be able to adjust placement. You mount one piece to the wall, one to the back of the art, and they hook together. Super secure and you can slide the piece horizontally to center it without new holes.
The Keyhole Mounting Situation
A lot of metal art comes with keyhole slots on the back. These are fine for lighter pieces but here’s the thing – they require really precise placement of your screws. I’ve spent way too many Saturday mornings holding pieces up, marking spots, drilling, realizing I was off by half an inch, filling holes, starting over…
Pro tip I learned from an installer: make a paper template. Tape paper to the back of your art, mark where the keyholes are, tape that paper to your wall, drill through the paper, remove it. Sounds extra but it works.
Finishes for Different Rooms
Where you put these matters more than I initially thought because humidity and light exposure and just general room vibes affect how they hold up.
Bathrooms: Only aluminum or heavily sealed pieces. Seriously. Even powder-coated steel can develop issues over time with steam and moisture. I have an aluminum eucalyptus branch piece in my bathroom that’s been perfect for over a year.
Kitchens: Grease is your enemy. Metal art near cooking areas needs to be something you can actually wipe down. Smooth finishes over textured. I learned this when my hibiscus piece above the stove developed this sticky film that was basically impossible to clean from all the tiny crevices.
Outdoor/covered patio spaces: You need either aluminum, stainless steel, or specifically outdoor-rated pieces. I’ve seen so many beautiful pieces completely destroyed by one season outside because someone assumed powder coating was enough. It’s not. Look for marine-grade or specifically outdoor-labeled pieces.
Bedrooms and living rooms: This is where you have the most flexibility. Just consider light exposure – direct sunlight will fade painted finishes over time. My turquoise lotus piece that gets afternoon sun has definitely lightened up after a year.
Mixing Metals and Other Decor
There’s this old rule about not mixing metal finishes and honestly? Forget it. Mixed metals look way more collected and interesting than everything matching perfectly. My gallery wall has brushed gold, matte black, and raw copper pieces and they work together because the flower motif ties them together.
What does matter is visual weight. If you’re mixing a chunky wrought iron piece with delicate wire art, you need something medium-weight between them to create transition. Otherwise it looks disjointed.
And scale variation – this is key. Don’t make all your pieces the same size even if they’re the same style. I group a large focal piece with two smaller complementary pieces usually. Creates more dynamic visual interest and honestly just looks more expensive than it probably was.
Where to Actually Buy Decent Pieces
I’ve ordered from like twenty different places at this point and here’s my honest take:
Etsy is hit or miss but when you find a good metal artist, bookmark them immediately. Read reviews with photos, not just star ratings. Ask questions before buying – good sellers respond quickly and know their materials. I’ve found some of my favorite pieces here but I’ve also received some absolute garbage.
Home goods stores (HomeGoods, TJ Maxx, etc.) have surprisingly good options if you’re patient and check regularly. It’s all overstock and random inventory so you can’t count on finding something specific, but the prices are usually 40-50% less than boutique shops. I got a massive rose sculpture at HomeGoods for $35 that I’ve seen similar versions of online for $120.
Wayfair and Overstock have huge selections but you really gotta read the fine print on dimensions and materials. The photos make everything look bigger and more substantial than it is. I always add at least a week to their estimated shipping times too.
Local metal artists and art fairs – this is where you’ll pay more but get actual custom work and quality materials. I commissioned a custom cherry blossom piece from a local artist for my client’s nursery and being able to specify exact colors and size was worth the extra cost.
Maintenance That Actually Works
Most metal art is pretty low maintenance but here’s what I actually do:
Dust regularly with a microfiber cloth or soft brush. Dust buildup is real and makes everything look dingy. I have a small paintbrush I use for getting into detailed areas.
For powder-coated pieces, just wipe with damp cloth when needed. Don’t use harsh chemicals – they can dull the finish over time.
Raw metal needs oil or wax every 3-4 months depending on your climate. I use mineral oil on my raw steel pieces, just rub it on with a cloth and buff off excess. Takes like five minutes.
If you get rust spots on steel or iron (it happens), you can carefully sand them with fine grit sandpaper, then touch up with matching paint or clear sealant. Not ideal but it works for small spots.
The Patina Question
Some people want patina, some people hate it. If you want to encourage that aged look on copper or brass, you can actually speed it up with vinegar and salt solutions – there are tutorials online. If you want to prevent it, clear coat sealant is your answer but you gotta reapply every year or so.
DIY Modifications I’ve Actually Done
Sometimes you find a piece that’s almost perfect but not quite, and if you’re even slightly handy you can modify metal art more easily than you’d think.
Adding color: I’ve spray painted several pieces to match specific color schemes. Use primer first on bare metal, then multiple light coats of paint, then clear sealant. Let each layer dry completely. My blue and gold ombre poppy piece started as plain black and now it’s the focal point of my dining area.
Bending and reshaping: Thinner gauge metals can be carefully bent with pliers to adjust petals or branches. I reshaped a lily piece to have more dramatic curves and it made such a difference. Just work slowly and don’t bend back and forth repeatedly or the metal will fatigue and break.
Combining pieces: I’ve zip-tied (yes really) multiple smaller pieces together to create larger installations. Cut the excess zip tie off close and position them behind petals where they’re hidden. Works great for creating custom gallery walls on a budget.
Common Problems and Fixes
Piece looks flat against wall: Add spacers behind the mounting points to give it more dimension. I’ve used everything from wine corks cut in half to those 3M command strips stacked. Just needs to sit slightly away from the wall to cast shadows.
Color doesn’t match photos: This happens constantly with online orders. If you’re handy with spray paint, you can fix it. If not, good lighting can help – warm bulbs make colors look richer, cool bulbs make them look more true to the metal tone.
Piece is too shiny/reflective: Matte sealant spray will tone down unwanted shine. Test on a small area first though because it can darken some finishes.
Sharp edges: Some cheaper pieces have legitimately sharp edges that could cut you. I file these down carefully with a metal file or sand them smooth. Takes like ten minutes and makes the piece way safer especially if you have kids or pets.
oh and another thing – if your piece comes with that plasticky protective coating on it, remove it ASAP. I left it on one piece thinking it would protect it longer and when I finally peeled it off months later, the adhesive had baked on in the sun and was impossible to remove completely. Goo Gone eventually worked but what a pain.
The market for metal floral art has exploded lately so there’s tons of options at every price point. I’ve seen pieces from $20 to $2000 and honestly the sweet spot for quality seems to be around $80-150 for a statement piece. Below that you’re often getting really thin metal that looks cheap in person, above that you’re paying for artist names or boutique markup unless it’s truly custom work.
Just measure your space twice, check the actual dimensions and weight in the listing, read reviews, and don’t be afraid to return things that don’t work. I’ve probably returned 30% of the metal art I’ve ordered and that’s just part of the process when you’re buying online without seeing it in person first.