Wall Art Guide, Wall Art Tutoriels
Mountain Wood Wall Art: Carved Alpine Peak Natural
Mar
So I’ve been working with these mountain wood wall art pieces for like the past year and honestly they’re trickier than you’d think. Like everyone sees them on Pinterest and goes “oh pretty” but then you get one home and it’s… a whole thing.
What You’re Actually Getting
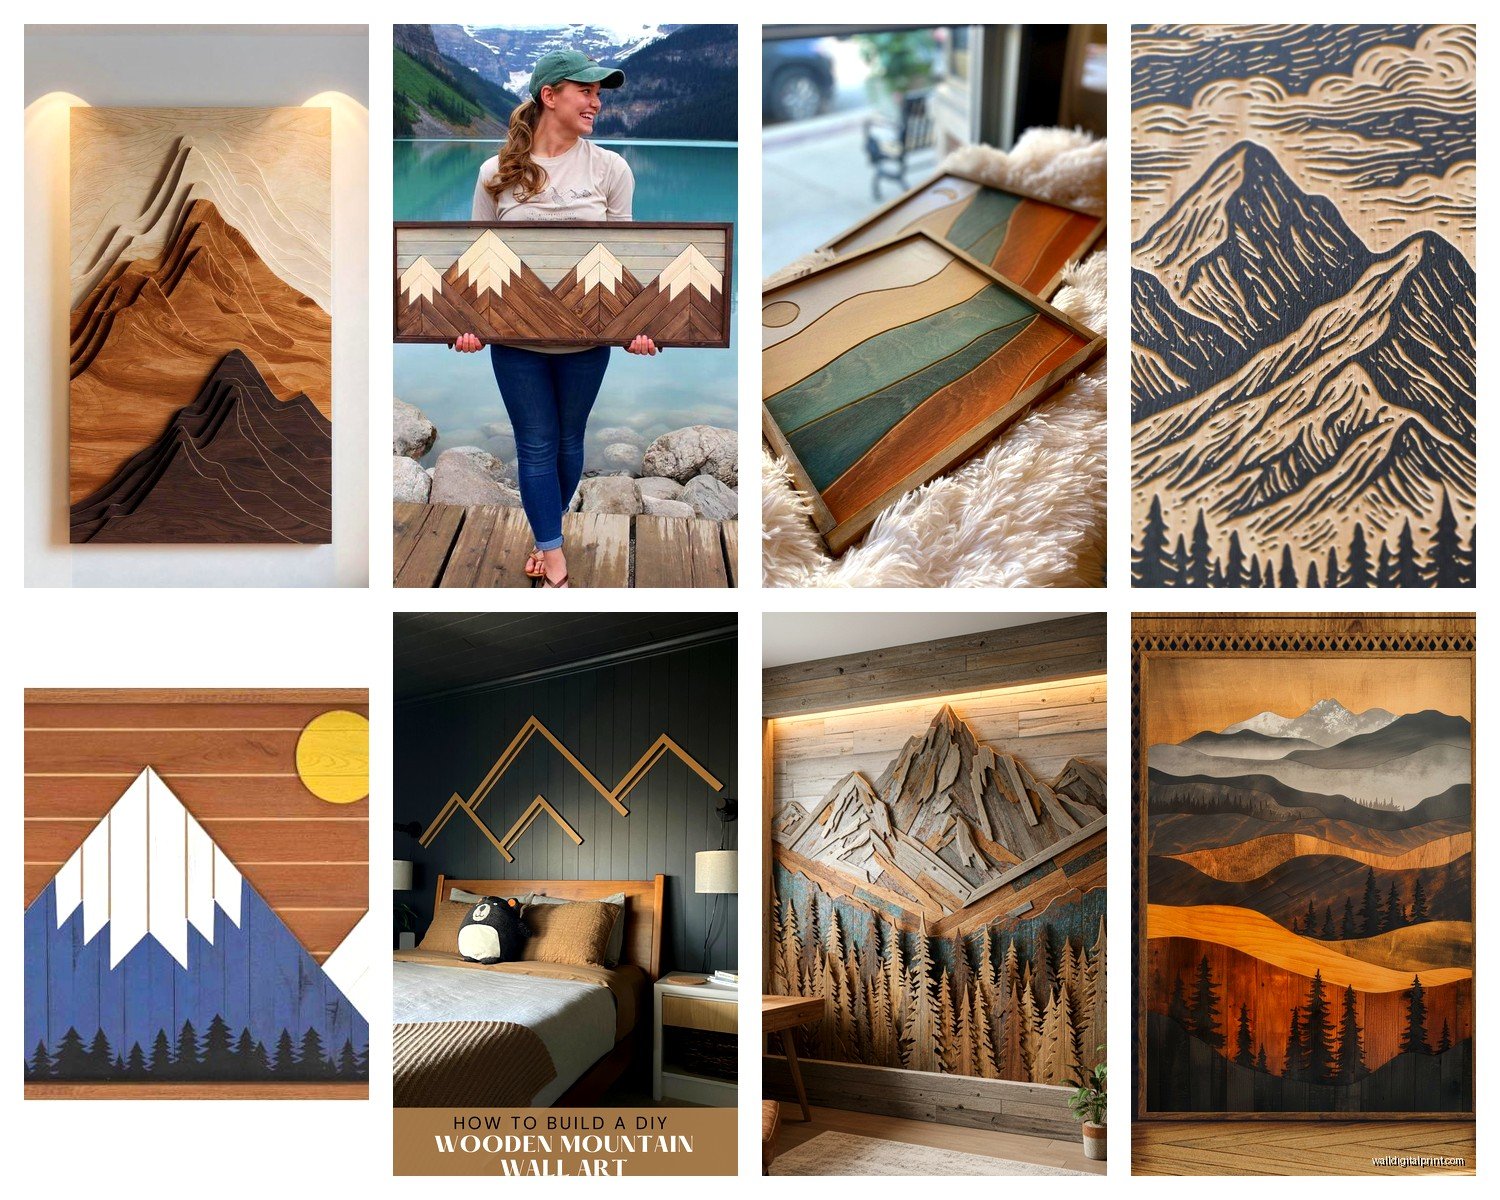
Okay so first off, carved alpine peak pieces aren’t all the same. At ALL. The natural wood ones specifically – we’re talking about pieces where someone (or a CNC machine, let’s be real) has carved mountain ranges into actual wood. Usually it’s pine, sometimes cedar, occasionally you’ll see walnut if someone’s feeling fancy. The grain matters SO much more than anyone tells you upfront.
I learned this the hard way with a client’s living room last spring. Ordered this gorgeous piece online, looked amazing in photos, showed up and the grain was running completely opposite to the mountain carving direction and it just looked… wrong? Like the mountains were sliding off the board. My dog knocked over my coffee while I was trying to figure out how to tell the client we needed to return it, whole mess.
Types of Wood and Why It Actually Matters
Pine is gonna be your most common and honestly it’s not bad. It’s lightweight which is great because these pieces can get heavy fast. The grain is usually pretty subtle so it doesn’t compete with the carving. But here’s the thing – pine dents easily. If you’re hanging this anywhere near a doorway or where kids might whack it with something, maybe reconsider.
Cedar smells amazing for like 6 months and then you stop noticing but it’s naturally resistant to moisture and bugs. I put one in a bathroom once (small powder room, not like a shower situation) and it held up perfectly. Cedar’s also lighter in color naturally which gives you more staining options if you’re into that.
Walnut or darker hardwoods look INCREDIBLE but they’re pricey and heavy. Like you need serious wall anchors, not those little plastic things that come in the package. Found that out when a piece crashed at 3am and I thought someone was breaking in.
The Carving Depth Situation
This is where people get confused. You’ve got basically three levels:
Shallow relief (like 1/4 inch deep) – these are more about the outline and shadow play. They’re subtle, modern looking, won’t collect as much dust. Good for minimalist spaces or if you’re not sure about going full mountain lodge vibes.
Medium relief (1/2 to 3/4 inch) – sweet spot for most rooms. You get actual dimension, the shadows change throughout the day which is cool, but it’s not so deep that cleaning becomes a whole project.
Deep relief (1 inch or more) – dramatic as hell, gorgeous, total pain to keep clean. Every speck of dust shows up in those valleys. But if you’re going for impact and don’t mind maintenance, these are stunning.
I’ve got a medium relief piece in my own place and honestly I just hit it with a soft brush attachment on the vacuum every couple weeks. Works fine.
Natural vs Stained Finishes
Okay so funny story, I used to always recommend stained pieces because they felt more “finished” but I’ve completely switched on this. Natural wood with just a clear coat is where it’s at, especially for alpine pieces.
The natural grain adds to the organic mountain feeling. Stains can hide the wood quality (sometimes that’s intentional, not great). And here’s what nobody mentions – if you ever want to refinish it or change the look, starting from natural is WAY easier than stripping stain.
That said, if your walls are light colored, sometimes you need a darker stain to create contrast. I did a weathered gray stain on a piece for a client with white shiplap walls and it looked perfect. Just make sure you’re seeing the actual stained wood sample, not a digital mockup, because monitors lie.
Size and Scale Things They Don’t Tell You
Everyone underestimates how big these need to be. Like you see a 24×48 inch piece online and think that’s huge, then it shows up and looks tiny on your wall.
For over a couch or bed, you want at least 2/3 the width of the furniture. So if your couch is 84 inches, you’re looking at 56 inches minimum for the art piece. Otherwise it just floats there looking awkward.
For a blank wall, measure the wall space and aim for filling about 60-75% of it. I know that sounds like a lot but these mountain pieces have so much negative space built into the design that they need that scale to make an impact.
Wait I forgot to mention – vertical vs horizontal orientation matters too. Most alpine peaks look better horizontal because, well, mountain ranges are horizontal. But I’ve seen some really cool vertical pieces that work if you’ve got a narrow wall space like between windows or next to a doorway.
Installation Reality Check
Oh man, installation. So the lightweight pine pieces can usually go up with regular picture hanging wire and hooks rated for the weight. But anything over 15 pounds (check this, pieces are heavier than they look) needs wall anchors or studs.
For drywall without studs, use toggle bolts or those snap toggle things. The regular plastic anchors will literally just rip out of the wall over time, especially with the depth of these carvings creating weird weight distribution.
I always hang these pieces with a slight forward tilt at the top – like 5-10 degrees. Sounds weird but it prevents dust from settling on the top edge as much and the shadows from the carving look better with light hitting from above at that angle.
If you’re hanging multiple pieces (like a mountain range across three panels), get a laser level. Seriously. Eyeballing it will drive you insane and you’ll end up with wonky mountains. Been there, had to respackle and repaint, not fun.
The D-Ring vs Wire Debate
Most carved pieces come with D-rings on the back which is actually better than wire for these. Wire can shift and the piece ends up crooked constantly. D-rings keep it stable. Just make sure they’re positioned about 1/3 down from the top of the piece, not halfway.
If it only has wire, you can add D-rings yourself pretty easily with a screwdriver and the right size screws (shorter than the wood thickness obviously, don’t go poking through the front).
Maintenance Nobody Warns You About
Dust is your enemy. Those carved valleys collect everything. I use a soft paintbrush (like a 2-inch chip brush from the hardware store) to get into the grooves every couple weeks. The vacuum thing I mentioned works too but sometimes the suction is too strong and you’re just banging the nozzle around.
Natural wood needs conditioning occasionally. Like once or twice a year, wipe it down with a barely damp cloth (seriously, barely damp, wood and water are not friends) and then use a furniture wax or wood conditioner. I like Howard Feed-N-Wax but honestly most brands work fine. This keeps the wood from drying out and cracking.
If it’s in direct sunlight, the wood WILL fade and change color over time. Some people like that patina effect, some people hate it. You can’t really prevent it without blocking the sun, so just decide if you’re okay with it before you hang it in that spot.
What to Look for When Buying
Check the edges and back. Rough, splintery edges mean someone rushed the finishing process. The back should be sanded smooth-ish even though you won’t see it – it shows attention to detail and means the front is probably well done too.
Look at the carving depth consistency. Are all the mountain peaks carved to similar depths or does it look random? Unless it’s specifically meant to be abstract, consistency matters for a quality piece.
Knots in the wood can be beautiful or distracting depending on placement. A knot in the middle of a prominent peak might look like a weird eye staring at you (this happened to me, returned it immediately). Knots off to the side or in the “sky” area usually look fine and add character.
The finish should be smooth but not plasticky. If it looks like they dumped polyurethane on it with a bucket, it’s gonna be shiny and weird. You want a matte or satin finish that enhances the wood without making it look fake.
Handmade vs CNC Cut
Real talk – most of these are CNC cut now and that’s not necessarily bad. CNC machines can create consistent, detailed carvings that would take forever by hand. The difference is in the finishing. Handmade pieces usually have more character in how the wood is treated and finished, even if the carving itself was machine assisted.
Fully handmade pieces are gorgeous but expensive and harder to find. If someone says handmade, ask if they mean hand-finished or hand-carved. There’s a price difference and you should know what you’re paying for.
Styling These Things
Okay so you’ve got your mountain wood art, now what? Don’t go overboard with the mountain lodge theme unless you’re really committing. Like one mountain piece plus some neutral textures looks sophisticated. Mountain piece plus antler chandelier plus plaid everything plus bear sculptures = Bass Pro Shop showroom.
These work surprisingly well in modern spaces if you keep everything else clean-lined. The organic nature of the wood carving contrasts nicely with modern furniture.
Color-wise, they pair well with blues, greens, grays, creams. Earth tones obviously. I’ve seen them work with darker walls too – a natural wood carving on a navy or charcoal wall looks really striking.
Don’t hang them too high. The center of the piece should be at eye level, which is usually around 57-60 inches from the floor. I see people hanging these way too high all the time and then you’re just staring at the bottom edge of mountains which defeats the whole point.
Where to Actually Buy Quality Pieces
Etsy has a ton but quality varies wildly. Read reviews carefully and look at customer photos not just the listing photos. Message the seller and ask about their finishing process and what kind of wood they actually use.
Some furniture stores are carrying these now but they’re usually mass-produced and overpriced. You’re paying for the retail markup plus mediocre quality.
Local craft fairs and art markets can be goldmines if you’ve got woodworkers in your area. You can see the piece in person, talk to the maker about customization, and usually negotiate a bit on price.
Oh and another thing – commission pieces are often not that much more expensive than buying pre-made, especially if you want specific dimensions or wood types. I’ve connected several clients with local woodworkers and they’ve been happy with the results.
Common Problems and Fixes
Wood cracking – usually happens if the piece wasn’t properly dried before carving or if it’s in a super dry environment. You can fill small cracks with wood filler that matches the color, sand smooth, and refinish that spot. Big cracks mean the piece wasn’t ready to be sold and you should probably return it.
Warping – this is worse than cracking. If your mountain range starts looking like a wave, the wood had moisture issues. You can try weighing it down flat for a few weeks but honestly, warped pieces rarely fully recover. Prevention is better – don’t hang these in bathrooms with showers or super humid areas.
Finish looking cloudy or sticky – someone used the wrong product or didn’t let it cure properly. You can sometimes fix this by very lightly buffing with 0000 steel wool and reapplying a thin coat of appropriate finish, but it’s annoying.
The piece just doesn’t look right in your space – happens more than you’d think. Sometimes the wood tone clashes, or the scale is wrong, or the room just isn’t working with it. Don’t force it. Sell it or move it to a different room. I’ve got a piece in my bedroom now that started in my living room and just didn’t work there.
Anyway that’s basically everything I’ve learned from working with these mountain wood pieces. They’re beautiful when done right but definitely do your homework before buying because returning a giant piece of carved wood is a hassle. Let me know which one you end up getting!