Wall Art Guide, Wall Art Tutoriels
Silver Metal Wall Art: Contemporary Metallic Designs
Mar
So I’ve been working with silver metal wall art for like three years now and honestly it’s one of those things that looks SO easy until you’re standing there with a drill wondering why nothing is level and your partner is giving you that look.
First thing – and I cannot stress this enough – figure out what kind of silver you actually want because “silver” in the metal art world is kinda like saying “blue” when there’s like fifty different blues. You’ve got brushed aluminum which is my go-to for most clients, then there’s polished stainless steel that’s super reflective and shows every fingerprint (learned that the hard way), and then there’s powder-coated stuff that reads as silver but doesn’t have that metallic shine. I spent an entire afternoon once trying to photograph the difference for my blog and my cat kept photobombing every shot so just trust me on this.
Choosing Your Actual Piece
The weight thing is gonna determine literally everything else. Lightweight pieces under 5 pounds you can hang with command strips honestly – I know everyone says you need proper hardware but I’ve had a geometric silver piece in my hallway for two years on heavy duty strips and it’s fine. Once you get above 10 pounds though you NEED proper anchors. I had this gorgeous abstract wave piece that was like 15 pounds and tried to use regular drywall anchors and it just… fell at 3am and scared us both half to death.
For sizing, everyone thinks bigger is better but actually in contemporary metallic designs, clusters of smaller pieces work way better than one massive statement piece. Unless you have like a double-height ceiling situation, then yeah go big. But for normal 8-10 foot ceilings, aim for pieces that are between 24-36 inches in their longest dimension. I’ve got this rule where the art should take up about 60-75% of the wall space you’re dedicating to it, so if you’ve got a 6-foot wide wall section, you want something around 3.5-4.5 feet wide.
The Finish Matters More Than You Think
Okay so funny story – I curated this whole gallery wall for a client using all polished silver pieces and she had west-facing windows and didn’t mention it. The glare at sunset was literally blinding. We had to swap half of them out for brushed finishes. Now I always ask about natural light direction first.
Brushed aluminum is forgiving and works in basically any light. It’s got that soft metallic look without being a mirror. Polished stainless is dramatic but you gotta be strategic – it works amazing in dimmer spaces or where you want to bounce light around. The powder-coated metallics are good if you want the silver color but less of that cold metal vibe, like they feel warmer somehow even though they’re still silver.
Installation Reality Check
You’re gonna need different hardware depending on what’s behind your wall. And yeah you gotta find the studs or use proper anchors. I keep a stud finder in my styling kit now because I got tired of the whole knock-on-the-wall method.
For drywall without studs, toggle bolts are your friend for anything over 10 pounds. The ones with the butterfly wings that open up behind the drywall. They look complicated but they’re actually easier than those stupid screw-in anchors that just spin forever and make you question your life choices.
If you hit a stud, regular wood screws work but make sure they’re long enough – at least 1.5 inches into the stud itself. I use D-ring hangers on the back of most pieces because they distribute weight better than wire, especially for contemporary geometric designs that need to hang perfectly straight.
The Level Situation
Get a laser level. Like actually spend the $25. I resisted for so long thinking my regular bubble level was fine and then I bought one and realized I’d been hanging things slightly off for YEARS. My husband still brings it up. The laser ones project a line across your whole wall so you can see exactly where everything should sit.
For multi-panel pieces or when you’re creating a gallery wall with several silver pieces, I use painter’s tape to map everything out first. Cut templates from paper bags or newspaper if you’re feeling fancy, tape them up, live with it for a day. Because once you put holes in the wall with metal art, those holes are way more visible than with regular framed art since there’s often negative space in the design.
Style Combinations That Actually Work
Silver metal art plays surprisingly well with other materials but you gotta balance the coldness. I almost always pair it with warm wood tones or soft textiles nearby. Like if you’re putting a silver geometric piece above a sofa, make sure you’ve got warm-toned throw pillows or a chunky knit blanket.
The monochrome thing works – silver with black, white, and gray – but it can feel really sterile really fast. I usually throw in one warm element, even if it’s just a wood coffee table or some brass accessories across the room.
Oh and another thing – silver metal art looks AMAZING with deep jewel tones. Like a silver abstract piece against a navy wall or with emerald green accents nearby. The contrast is chef’s kiss.
Lighting Considerations You’ll Forget About
This is gonna sound weird but the time of day changes how silver metal art looks more than any other type of art. Morning light hits it different than evening light. If you can, look at the space at different times before committing to placement.
Track lighting or picture lights don’t work the same way as with traditional art. You want ambient lighting more than direct spotlights because direct light on polished silver creates hot spots. I usually suggest putting the overhead lighting on dimmers so you can control how much the piece reflects.
For hallways or darker spaces, silver metal art can actually help brighten things up by bouncing available light around. I put a large silver sunburst design in a dark hallway in my own place and it made such a difference I almost cried (I’d been staring at that depressing hallway for months).
Maintenance Nobody Tells You About
Silver metal art gets dusty. Like really dusty. And you’ll never notice until you do and then you can’t unsee it. Microfiber cloths are your cleaning tool – never use paper towels because they can scratch. For brushed finishes, I just dust weekly with a dry cloth.
For polished finishes, you’re gonna need actual stainless steel cleaner maybe once a month if it’s in a high-traffic area. Fingerprints show up like crazy. I learned to just embrace it in my own home but for clients I always mention this because some people are bothered by it and some aren’t.
The powder-coated pieces are honestly the lowest maintenance – just dust them and you’re good. They don’t show smudges or water spots if they’re in a bathroom or kitchen area.
Where to Actually Buy Quality Pieces
I’ve tested stuff from everywhere at this point. Wayfair has a huge selection but quality is hit or miss – read the reviews carefully and look at customer photos. Some pieces look amazing in professional shots but arrive looking cheap.
West Elm and CB2 have really solid contemporary metal art but you’re paying for the brand. That said, their stuff actually looks like the photos and the mounting hardware is usually included and decent quality.
Etsy is where I find the most unique pieces, especially from metal artists who do custom work. Just make sure they have good reviews and ask about the gauge of metal they’re using. Anything under 18 gauge is gonna feel flimsy for larger pieces.
Local metal artists at art fairs or galleries often have pieces that are way more interesting than mass-produced stuff, and you can ask them directly about installation. Plus you’re supporting actual artists which feels good.
Common Mistakes I See All the Time
Hanging it too high. The center of your art should be at eye level, which is usually around 57-60 inches from the floor. I see so many people hang metal art way up near the ceiling and it just floats there looking awkward.
Not considering the wall color behind it. Silver on light gray walls can disappear. You want contrast – either go darker or add a colored wall behind it. I did a silver geometric piece on a charcoal accent wall last month and the client texted me photos like three times because she was so happy with it.
Mixing too many metal finishes in one space. If you’re doing silver metal art, be intentional about your other metals. You can mix metals but having silver art, gold picture frames, bronze lamps, and copper accessories all together looks chaotic. Pick two metal finishes max for the whole space.
Forgetting about furniture placement. That beautiful silver piece isn’t gonna look right if you rearrange your furniture later and suddenly there’s a floor lamp blocking half of it. Think about the whole wall composition including what’s in front of it.
The Size-to-Space Ratio Thing
This trips people up constantly. For above a sofa, your art should be about 2/3 the width of the sofa. So if you have a 7-foot sofa, you want art that’s around 4.5-5 feet wide. You can achieve this with one large piece or a grouping.
For a gallery wall situation with multiple silver pieces, lay everything out on the floor first and measure the overall dimensions of your arrangement. Then make sure that whole arrangement follows the 2/3 rule or whatever furniture piece is below it.
In dining rooms, the art should be proportional to the table, not the wall. I see people put tiny pieces above huge dining tables and it looks lost.
Wait I forgot to mention – for super modern geometric designs, odd numbers work better than even. Like three squares in a row looks more intentional than two or four. Something about visual balance.
Trendy Styles That Are Actually Lasting
Geometric abstracts aren’t going anywhere. The clean lines work with contemporary design but they’re versatile enough to not feel dated quickly. I’m talking circles, hexagons, overlapping shapes – that stuff has staying power.
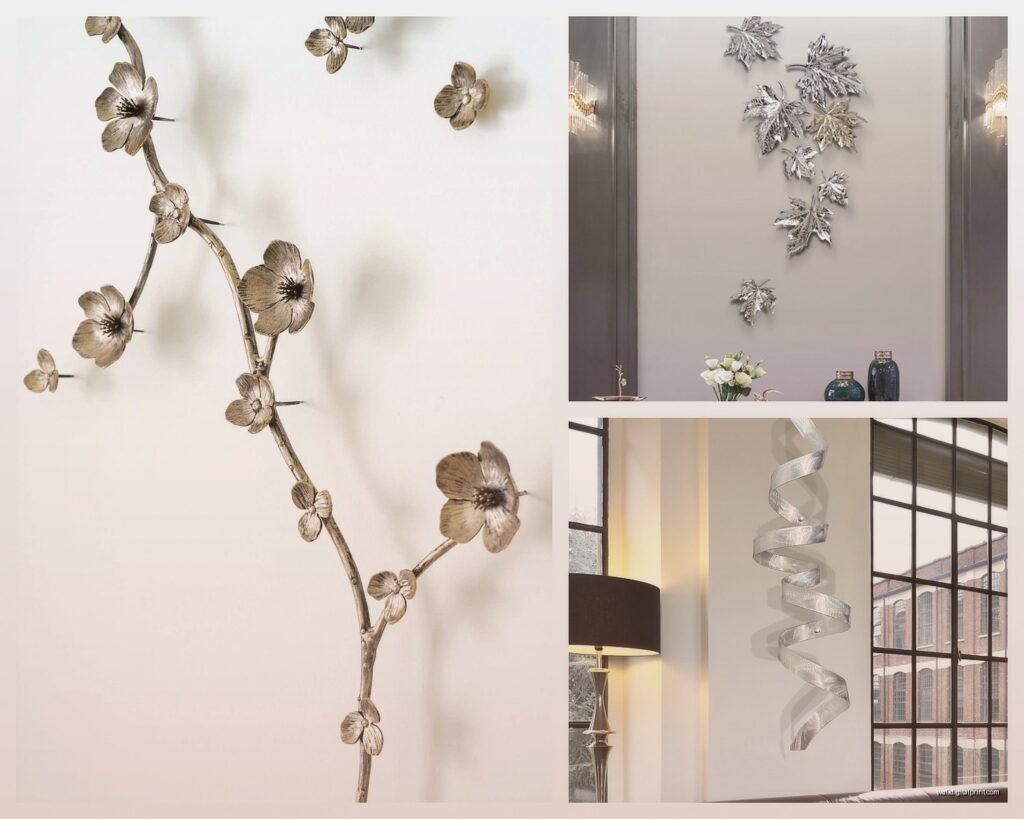
Nature-inspired designs in silver are having a moment but pick carefully. Abstract leaf patterns or organic shapes are safer than literal flower designs which can feel dated fast.
The layered/dimensional pieces where the metal has depth and shadow are worth the extra money. Flat metal cutouts can look cheap but when there’s actual dimension it reads as more sophisticated.
Honestly avoid anything too literal or themed. Silver metal art works best when it’s abstract or geometric rather than trying to be a picture of something specific.
The installation part gets easier after you do it a few times, and the visual impact of silver metal art is worth the effort. Just measure twice, drill once, and don’t try to install anything large by yourself because you’ll end up with uneven holes and regret. Trust me on that one.

