Wall Art Guide, Wall Art Tutoriels
Large Bathroom Wall Art: Oversized Bath Space Designs

Apr
So I’ve been dealing with this bathroom wall art situation for like three years now, ever since I realized that the massive blank wall in my master bath was basically screaming for something and I kept just… staring at it every morning. Here’s what I’ve actually learned from installing way too many oversized pieces in bathrooms.
The Moisture Problem Nobody Warns You About
Okay so first thing – bathrooms are basically humid nightmare zones for art, and if one more person tells me “oh just use any canvas” I’m gonna lose it. I made this mistake in my guest bath with this gorgeous abstract piece I got from a local artist, and within six months the canvas was warping at the corners. Not cute.
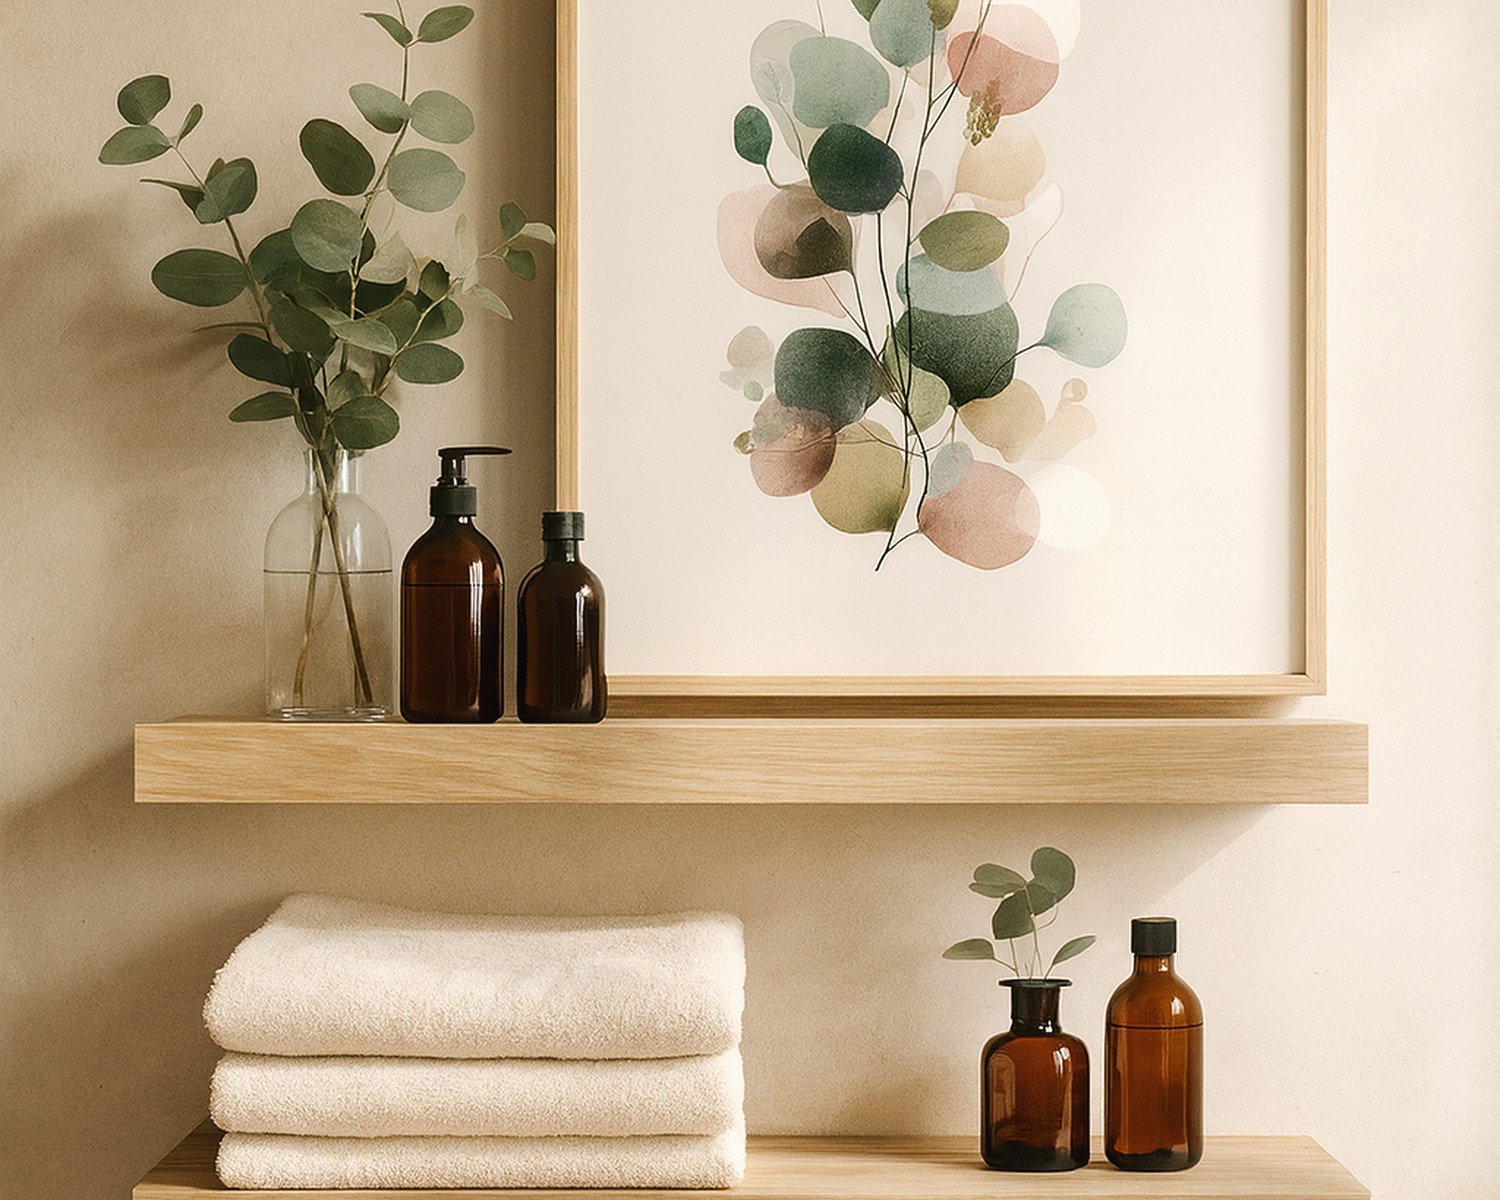
What actually works is acrylic prints or aluminum-mounted pieces. The acrylic ones are like… they’re basically a photograph or print sandwiched behind a thick acrylic panel, and moisture just slides right off. I installed a 40×60 inch acrylic print above my soaking tub two years ago and it still looks perfect. You can literally wipe steam off it with your hand.
Aluminum prints are even better honestly. They’re lightweight which matters SO much when you’re hanging something massive, and the image gets infused directly into a metal sheet. My client Janet has one in her bathroom that gets direct shower steam and it’s been three years with zero issues.
Materials That Actually Survive
Here’s my tested list:
- Acrylic prints – pricey but worth it for high-moisture areas
- Aluminum or metal prints – my personal favorite, super modern look
- Sealed wood art – if you’re going for that organic vibe, but it HAS to be properly sealed
- Outdoor-rated canvas – exists but hard to find in custom sizes
- Glass-covered prints in waterproof frames – works but gets heavy fast
- Tile murals – permanent but gorgeous if you’re committed
What to avoid: regular canvas, unprotected paper prints, anything with exposed wood backing, fabric wall hangings unless you have insane ventilation.
Size Considerations That Nobody Talks About
So everyone says “go big or go home” with bathroom art but like… there’s a sweet spot. I learned this the hard way when I ordered a 72-inch piece for a bathroom that had a 60-inch wall space because I didn’t account for the toilet paper holder. Had to return it, whole thing was a mess.
My rule now: measure your wall space, subtract at least 12 inches from each dimension for visual breathing room and obstacles. So if you have a 6-foot wall, you’re looking at something around 48-60 inches max.
Oh and another thing – consider the viewing distance. In my powder room, you’re literally three feet from the wall when you’re at the sink, so I went with a 24×36 piece instead of something huge. In the master bath where there’s more space, the 40×60 works because you see it from across the room.
Weight Management Because Your Walls Matter
This is gonna sound weird but I keep a bathroom scale near my art supplies now. Large pieces get HEAVY, especially if you go with glass or thick acrylic. A 48×36 acrylic print can easily hit 25-30 pounds.
For drywall (which is what most bathrooms have), you absolutely need:
- Heavy-duty wall anchors – the toggle bolt kind that expand behind the drywall
- Multiple hanging points – I use at least 4 anchor points for anything over 30×40
- French cleats for anything over 40 pounds – they’re these interlocking wood or metal strips that distribute weight
I had a piece fall at 2am once because I used regular picture hangers on a 35-pound aluminum print. My dog absolutely lost her mind, I thought someone broke in, whole dramatic thing. Use proper hardware.
Design Styles That Work in Bathrooms
Okay so I’ve tested basically every aesthetic at this point between my own bathrooms and client projects. Here’s what actually looks good when it’s oversized:
Abstract and minimal work best. When you’ve got a huge piece in a relatively small room, busy patterns or detailed photography can be overwhelming. I did this massive Rothko-inspired color block piece in my master bath – just soft blues and grays – and it’s perfect. Calming but makes a statement.
Botanical prints are having a moment and they actually work great large-scale. But go for simple compositions – one palm frond, a single flower stem, that kind of thing. I saw someone do a 5-foot tall monstera leaf print and it was stunning.
Black and white photography is pretty foolproof for oversized bathroom art. Architectural shots, landscapes, abstract textures. My friend has this massive black and white ocean wave photo in her bathroom and every time I’m there I’m like… yeah that’s it, that’s the vibe.
What doesn’t work as well: portraits get weird when they’re huge and you’re naked (just trust me), super colorful busy patterns unless your bathroom is all white, anything too literal or obvious like… we get it, it’s a bathroom, you don’t need a giant rubber duck painting.
Installation Tricks I Wish Someone Told Me
Wait I forgot to mention – steam and heat make walls expand and contract slightly. This means you need to account for some flexibility in your hanging system.
For really large pieces, I now use a combination of secure top anchors and bottom bumpers (those little clear rubber dots) that let the piece sit against the wall but with tiny bit of give. This has prevented so many problems.
The Actual Hanging Process
Get someone to help you. Seriously. I tried to hang a 48×60 piece by myself and ended up with three extra holes in my wall because I couldn’t hold it level and drill at the same time.
My process now:
- Mark the wall with painter’s tape to visualize size and placement
- Use a level app on your phone AND an actual level because I’m paranoid
- Mark anchor points with pencil
- Pre-drill holes (THIS IS IMPORTANT – prevents cracking tile or drywall)
- Install anchors, then mounting hardware
- Have helper hold piece while you adjust and secure
For tile walls, you gotta use masonry bits and tile-specific anchors. I cracked a tile once by using regular bits and my contractor still brings it up.
Where to Actually Buy This Stuff
So like, custom acrylic prints – I use Fracture or Nations Photo Lab depending on the project. Fracture does smaller sizes (up to about 36 inches) but they’re super affordable and the quality is solid. Nations Photo Lab goes bigger and has more material options but you’re paying for it.
Aluminum prints – Bay Photo is my go-to. Their ColorByte process is chef’s kiss. Expensive but the colors are insane.
Oh and Minted has some great oversized art options that you can get mounted on different materials. Their artist community is huge so there’s actually good variety.
For budget options – and this is gonna sound weird but – Costco’s photo center does acrylic prints up to 20×30 which isn’t massive but works for smaller bathrooms. Like $60-80 versus $300+ elsewhere.
If you want actual original art, Saatchi Art has a humidity-resistant filter in their search (buried in the materials section) and you can find artists who work in waterproof mediums.
Budget Breakdown Reality Check
Because everyone always asks me this…
Budget tier ($100-300): Smaller acrylic prints (20×30 to 24×36), basic aluminum prints, high-quality poster in moisture-resistant frame
Mid-range ($300-800): Large format acrylic or aluminum (36×48 to 40×60), custom photography prints on waterproof materials, framed canvas with proper sealing
Investment tier ($800+): Massive statement pieces (60+ inches), original art on marine-grade materials, custom tile murals, commissio work
I usually tell people to spend what they’d spend on a good bathroom mirror. If you’re gonna stare at it every day, it’s worth investing in.
The Ventilation Factor
Your bathroom ventilation situation totally affects what you can get away with. My powder room has a window and a good exhaust fan, so I pushed it with a sealed canvas piece. My basement bathroom has basically no air movement, so I only put aluminum prints in there.
If you have a bathroom that gets super steamy and stays that way – like no window, weak fan, lots of hot showers – stick with metal or acrylic. Just trust me on this. The extra $100 is worth not replacing warped art in a year.
Lighting Makes or Breaks It
This is something I didn’t consider at first but OMG it matters. A massive piece of art needs proper lighting or it just becomes a dark blob on your wall.
I added two small picture lights above my 40×60 piece and it completely transformed it. You can get battery-operated LED picture lights now that are super easy to install – no electrician needed.
If your bathroom has good natural light, position the art where it’ll catch it but not get direct sun all day. UV damage is real even with moisture-resistant materials.
Okay so funny story – I was watching this home renovation show while installing art in my bathroom last month and the designer just… slapped a regular canvas print directly across from the shower. I was yelling at the TV because that’s gonna be a moldy mess in like six months.
Framing Options for Large Pieces
If you’re going the framed route, you need moisture-resistant frames. Metal frames work great – aluminum or stainless steel. Some companies make composite frames that look like wood but are actually waterproof plastic, and honestly they’re pretty convincing.
Real wood can work if it’s properly sealed, but you’re gonna need to reseal it every couple years. I have a client who insists on wood frames in her bathroom and we literally schedule maintenance appointments to treat them.
Frameless is honestly easier for bathrooms. Float mounting (where the print sits off the wall slightly) looks super modern and lets air circulate behind the piece.
DIY vs Professional Installation
Look, I do most of my own installation now but there’s a learning curve. For anything over 50 pounds or if you’re dealing with tile walls or awkward placement, call someone. I spent $150 to have a handyman install a particularly heavy piece over my bathtub and it was worth every penny for the peace of mind.
If you’re gonna DIY, invest in good tools. A real stud finder (not the app), quality drill bits, proper anchors. My dad always says “buy once, cry once” and he’s annoying but right.
The reality is most people can handle installing smaller pieces (under 30 pounds, straightforward drywall) but once you get into the really oversized stuff or complicated walls, professional help saves you from expensive mistakes.
Maintenance Nobody Mentions
Even waterproof art needs some care. I wipe down my acrylic prints monthly with just a microfiber cloth and water. No harsh chemicals because they can damage the coating over time.
Check your hanging hardware every few months, especially in humid bathrooms. Sometimes anchors can loosen as walls expand and contract with temperature changes.
And honestly, even the best materials will eventually show wear in a bathroom environment. I budget for replacing bathroom art every 5-7 years, which feels reasonable given the conditions.
Anyway, that’s basically everything I’ve learned from way too many bathroom art projects. Start with proper materials, size it right, hang it securely, and you’ll be good. The investment in quality materials upfront saves you so much hassle later.