Wall Art Guide, Wall Art Tutoriels
Minnie Mouse Wall Art: Disney Kids Room Girl Decor
Jun
So I’ve been down this Minnie Mouse wall art rabbit hole lately because three different clients asked about Disney room makeovers this month and honestly? It’s way more complicated than just slapping up a poster. Let me walk you through what actually works.
The Canvas vs Print Situation Nobody Talks About
Okay so first thing – you’re gonna see a million options and they fall into basically two camps. There’s the canvas prints which look more “sophisticated” (using that word loosely for cartoon mice but you know what I mean) and then there’s the paper/poster prints that are cheaper but honestly sometimes look better depending on your wall situation.
I tested both in my niece’s room last month and here’s the deal. Canvas works amazing if you’ve got textured walls or imperfections you’re trying to hide. The depth of the canvas kinda… distracts from wall flaws? But if you’ve got smooth walls and good lighting, a quality print in a nice frame actually photographs better and looks cleaner.
The canvas sets on Amazon run like $30-60 for three pieces usually. I grabbed the ones with the watercolor Minnie because my sister wanted something that didn’t scream “5-year-old lives here” even though a 5-year-old does in fact live there. The colors were more muted pinks and golds instead of that bright red everywhere.
Size Actually Matters More Than You Think
This is gonna sound weird but I messed this up the first time. Got these cute 8×10 prints and they just looked… sad on the wall. Too small. Kids rooms can handle bigger art because everything else in there is chaotic anyway.
Go for at least 12×16 if you’re doing a single piece above the bed or dresser. If you’re doing a gallery wall situation (which I’ll get to in a sec), you can mix sizes but your anchor piece needs to be substantial. I’m talking 16×20 minimum for the main one.
My cat knocked over my coffee while I was measuring this stuff out and I had to redo the whole layout so learn from my pain – measure twice, especially if you’re working around furniture that might move.
The Gallery Wall Thing Everyone Wants
Okay so funny story, every single parent shows me the same Pinterest image of a perfect Minnie gallery wall with like 9 frames all coordinated. Here’s what they don’t tell you – that takes HOURS to get right and you’ll probably make holes in the wrong spots.
What actually works: get a set that’s designed to go together. There are these 3-piece sets where it’s one image split across three canvases. Super easy to hang because the spacing is more forgiving. You just need them roughly lined up and it looks intentional.
If you want the real gallery wall with multiple different images, use this trick I learned from my mentor – lay everything out on the floor first in the exact arrangement. Take a photo from above. Then measure from a corner point on each frame to create a map. Sounds extra but it saves you from 47 nail holes.
Mix these elements for a gallery that doesn’t look too matchy:
- One large Minnie canvas or print as your focal point
- Two or three smaller coordinating pieces – polka dots, bows, or her silhouette
- Maybe one piece of actual text like her name or a Disney quote
- A small shelf with a Minnie figurine so it’s not all flat art
The key is varying the sizes but keeping the color palette tight. I usually stick to 3 colors max – like pink, gold, and white. Or pink, black, and a soft gray.
Where to Actually Buy This Stuff
Amazon has the biggest selection and honestly the quality is hit or miss but the return policy saves you. I’ve ordered probably 15 different sets at this point and kept maybe 8. The reviews with photos are your best friend – if someone uploaded an actual room pic, study that lighting.
Etsy is where you find the really unique stuff. There are sellers who do custom Minnie prints with the kid’s name incorporated, or more artistic interpretations. I found this one shop that does Minnie in different art styles – there’s a Van Gogh starry night version that’s actually gorgeous? More expensive though, like $25-40 per print before framing.
Target and Walmart have limited options but they’re good for the basics. I grabbed a simple framed print from Target for $18 that works perfectly in a nursery setup.
Oh and another thing – Disney Store official stuff is weirdly hard to find for wall art. They focus more on bedding and accessories. When they do have wall decor it’s usually decals not framed art.
The Decal Debate
Wall decals are a whole separate category and I have THOUGHTS. They’re removable which parents love, and they’re usually cheaper than framed art. But here’s what nobody tells you – they look cheap in photos. Like if you’re gonna post this room on Instagram or whatever, decals photograph flat and boring.
That said, they’re perfect for renters or if you’re not ready to commit to holes in the wall. The giant Minnie head decals can be cute as an accent with other art pieces. Just don’t make them your only wall decor.
Application tip because I’ve messed this up – clean your wall with rubbing alcohol first and let it dry completely. Apply decals when the room is warm, not cold. They stick better. And use a credit card to smooth out bubbles as you go.
Color Schemes That Don’t Make You Wanna Cry
The default Minnie palette is red, black, white, and hot pink. It’s… a lot. Especially in a small room. Here’s how I tone it down while keeping it recognizable:
Go for the blush pink versions instead of hot pink. There are tons of prints now with Minnie in softer colors – dusty rose, peach, coral, mint even. Pair those with gold or silver accents instead of black and it feels more sophisticated.
Or flip it – do black and white Minnie silhouettes with just pops of color. I did a whole room with black and white prints and then brought in pink through the bedding and a rug. Way more flexible as she gets older too.
The watercolor style Minnie art is having a moment and I’m here for it. Less cartoon-y, more artistic. Still obviously Minnie but it doesn’t feel like you’re living inside a Disney store.
Framing Without Going Broke
If you’re buying unframed prints to save money (smart), don’t cheap out completely on frames. Those $5 plastic frames from the dollar store look exactly like $5 plastic frames.
IKEA frames are the sweet spot – affordable but they don’t look terrible. The RIBBA series comes in tons of sizes and they’re like $10-20 each. They have enough weight to feel quality but won’t destroy your budget.
Michael’s always has frame sales, like 50% off is basically their regular price? Wait for a sale and stock up. Or use their custom framing for one statement piece and do the rest yourself.
I’m gonna be honest, I frame stuff while watching trashy reality TV because it’s mindless work once you get the hang of it. You just need a clean surface and patience.
Layout Tricks I’ve Actually Used
Above the crib or toddler bed – go horizontal. Either one long piece or three squares in a row. You want the visual weight spreading sideways not towering up because it feels safer somehow? Less like stuff could fall on them even though obviously you’re securing everything properly.
Over a dresser that’s gonna stay there – do a vertical arrangement. One piece above another or a cluster that goes up. This works because the dresser anchors it.
On a big empty wall – this is your gallery wall moment. Map out a rectangle or square shape with your outermost frames and fill in the middle. The overall shape should be geometric even if the individual pieces are different sizes.
Wait I forgot to mention – Command strips are your friend for lightweight canvas pieces. The velcro ones hold up to 16 pounds and you don’t need to patch holes later. I use actual nails for anything framed with glass though because I’m paranoid.
Mixing Minnie With Other Decor
You probably don’t want a 100% Minnie room unless your kid is absolutely obsessed. Here’s how to blend it:
- Dedicate one wall to Minnie art and keep other walls neutral or geometric patterns
- Mix in other Disney characters but keep the color palette consistent
- Add non-character elements like clouds, stars, or florals in the same colors
- Use Minnie as an accent – maybe 30% of the decor not 100%
I did a room last fall where we had Minnie art on one wall, a cloud shelf on another, and string lights shaped like stars. The pink and white color scheme tied it together but it didn’t feel overwhelmingly themed.
The Age Problem
Kids outgrow stuff fast. A 3-year-old who’s obsessed with Minnie might be over it by 7. Here’s how I future-proof:
Get prints not canvases for the main pieces. You can swap out prints in the same frames as interests change. Way cheaper than replacing entire canvas sets.
Choose more abstract or artistic Minnie designs. The silhouette stuff or minimal line drawings age better than the full-color cartoon versions.
Keep the wall color neutral. Don’t paint the whole room Minnie pink. Use the art to bring in color so you can change it easily.
One client did this smart thing where she bought nice frames and we swap the art every year or two. Started with Minnie, moved to unicorns, now we’re on llamas or something. Same frames, same layout, different prints.
Lighting Makes or Breaks It
This is something I didn’t pay attention to at first but it matters SO much. Wall art looks completely different depending on your lighting situation.
If you’ve got harsh overhead lighting, the colors in prints can wash out. Add a lamp or string lights to create softer ambient light. Those Minnie-shaped nightlights actually serve double duty – functional for nighttime and they illuminate the art nicely.
Natural light is tricky because it can fade prints over time. Don’t put valuable or expensive art directly in a sun beam. Either use UV-protective glass in the frames or position art on walls that get indirect light.
I learned this the hard way when a print I’d hung in direct afternoon sun started looking pink instead of red after like 6 months. Had to replace it.
DIY Options If You’re Crafty
Print your own from Etsy downloads – there are tons of sellers offering instant download Minnie prints for $5-8. You download the file and print it yourself at home or through a print shop. Way cheaper if you’re doing multiple pieces.
I use Staples or FedEx for printing because my home printer makes everything look weird and striped? Their quality is pretty decent for the price.
You can also create your own if you’re artsy. Get a canvas and paint Minnie’s silhouette in black on a pink background. Or do polka dots with a bow. Simple geometric stuff that’s recognizably Minnie without needing actual drawing skills.
Mod Podge Disney scrapbook paper onto canvas boards. This sounds Pinterest-y but it actually works and looks cute in a handmade way.
What’s Actually Worth The Money
Okay real talk – most Minnie wall art is overpriced for what it is. You’re paying for the licensing. But some stuff is worth spending a bit more:
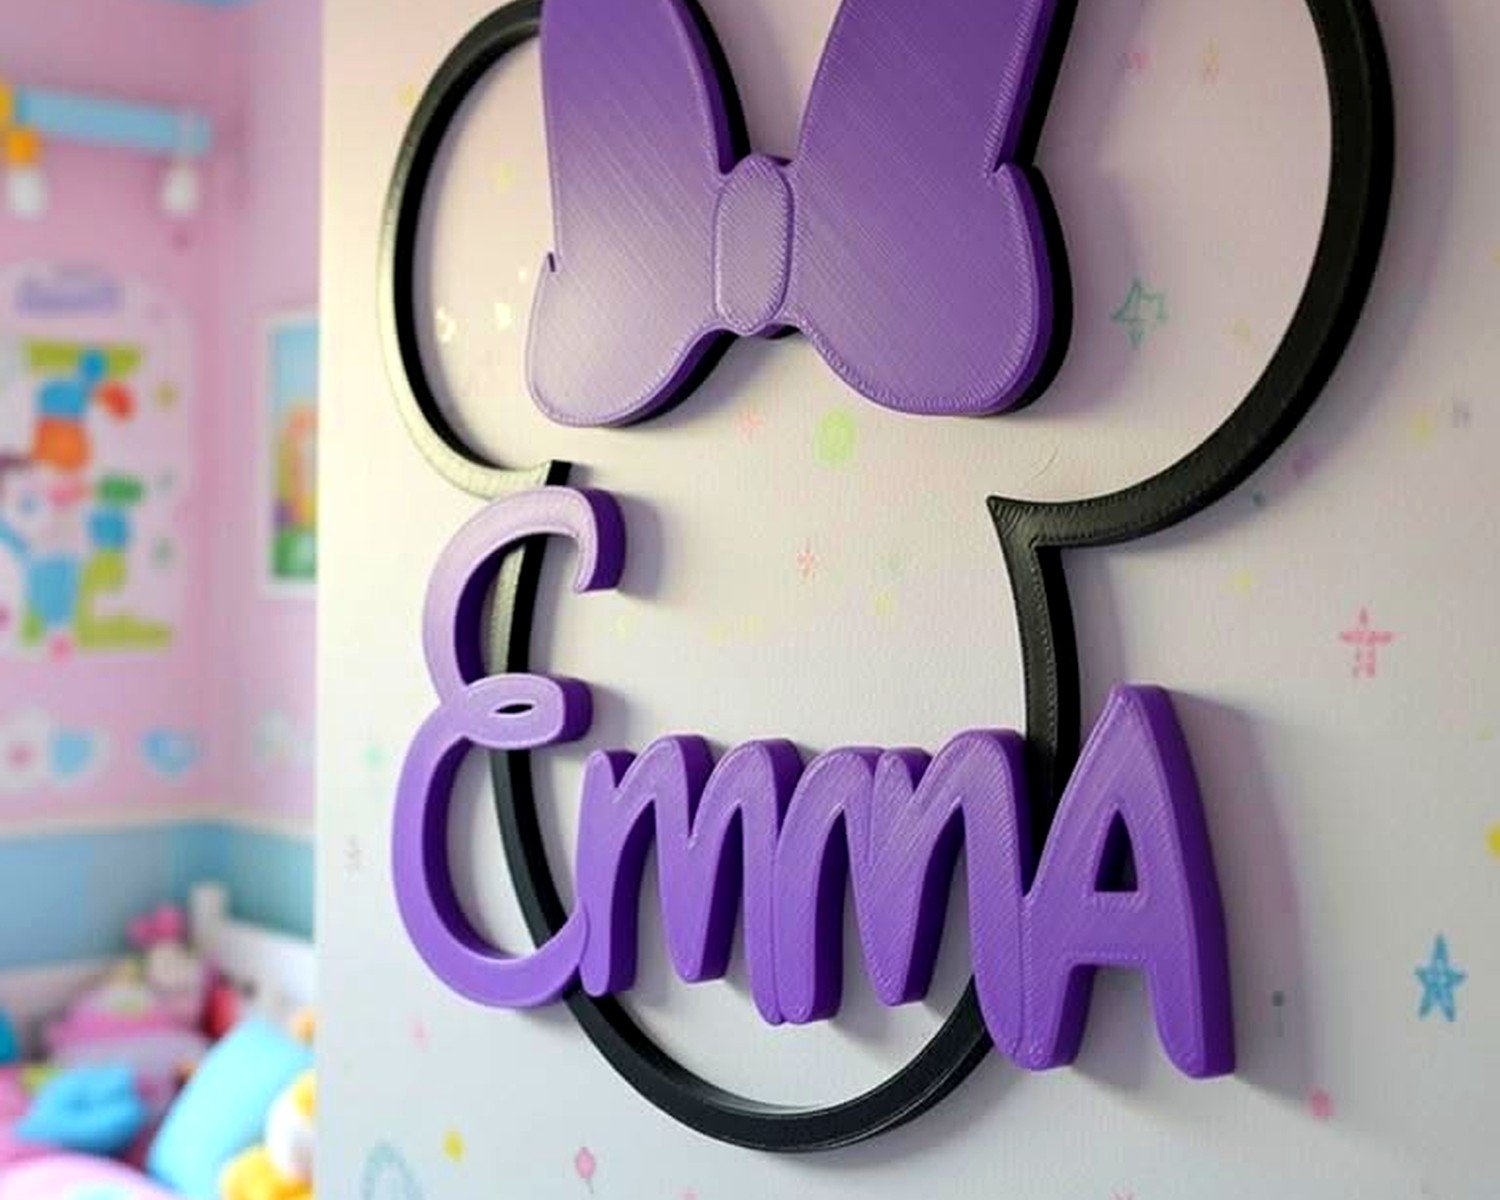
Custom name pieces that incorporate Minnie – these feel special and personal. Worth the $30-50 if it’s good quality.
Large statement canvas that’s the focal point – go for better quality here because it’s the first thing you see. Budget $50-80.
Everything else? Go budget. The small accent pieces don’t need to be expensive. Amazon basics or Target clearance works fine.
I tell clients to invest in 1-2 quality pieces and fill in around them with cheaper stuff. Nobody’s inspecting every single frame to see if it’s premium quality.
The room should feel cohesive and cute, not like a museum. It’s a kid’s space – it’s gonna get messy and stuff will get damaged. Don’t spend so much that you’re stressed about handprints on the wall.
Alright I think that covers most of what I’ve learned through trial and error with these Minnie rooms. The main thing is don’t overthink it – kids just want to see their favorite character and parents want it to look decent in photos. Find that balance and you’re good.