Wall Art Guide, Wall Art Tutoriels
5 Panel Wall Art: Multi-Piece Panoramic Sets
Mar
So I’ve been working with 5-panel wall art for like three years now and honestly, it’s one of those things that looks SO impressive when you get it right but can go completely sideways if you don’t know what you’re doing. Let me just dump everything I know because I literally just finished installing one in a client’s living room yesterday and my arms are still sore.
The Spacing Thing Everyone Gets Wrong
Okay so first thing – spacing between panels is where most people totally mess up. You’d think it’s intuitive but it’s not. The standard gap is 2-3 inches between each panel, and I’m gonna be honest, I used to do 4 inches because I thought it looked “airier” and every single time it just looked disconnected and weird.
Here’s what I actually do now: I use 2.5 inches for smaller sets (like under 60 inches total width) and stick to 2 inches for anything bigger. The panels need to feel like they’re part of one image, not five separate pictures that happen to be near each other. I keep a small level and those foam spacers from the hardware store – the ones that are exactly 2 inches thick – and just move them along as I hang each piece.
Oh and another thing, the HEIGHT of the panels matters way more than people think. Your center panel (that’s usually the tallest one in most sets) should have its center point at about 57-60 inches from the floor. That’s standard gallery height and it actually works for most spaces. Unless you have like, weird ceiling heights or you’re hanging above furniture, then we gotta adjust.
Measuring Before You Buy (Because Returns Are Annoying)
I cannot stress this enough – measure your wall space before you fall in love with a set. I’ve seen people buy these gorgeous 80-inch wide panoramic sets and then realize their wall is only 70 inches between the window and the corner. Now you’ve got this return situation and…yeah.
What I do: measure the full width of the wall space, then subtract at least 12-18 inches. That’s your maximum art width. So if you have a 100-inch wide wall, you’re looking at sets that are 82-88 inches max. This gives you breathing room on both sides which actually makes the art look more intentional.
For above-furniture situations (which is like 80% of where these go), the art should be about 2/3 the width of the furniture piece. So if your couch is 90 inches, you want your 5-panel set to be around 60 inches wide. I’ve broken this rule before and it can work, but it’s a good starting point.
The Actual Panel Sizes to Look For
Most 5-panel sets come in these configurations and I’m just gonna list what I’ve found works:
- Small: Total width 40-50 inches (good for apartments or above dressers)
- Medium: Total width 60-70 inches (most common, works above queen beds or standard sofas)
- Large: Total width 80-90 inches (statement pieces, needs a big wall)
- Extra large: 100+ inches (I’ve only used these in commercial spaces or homes with really high ceilings)
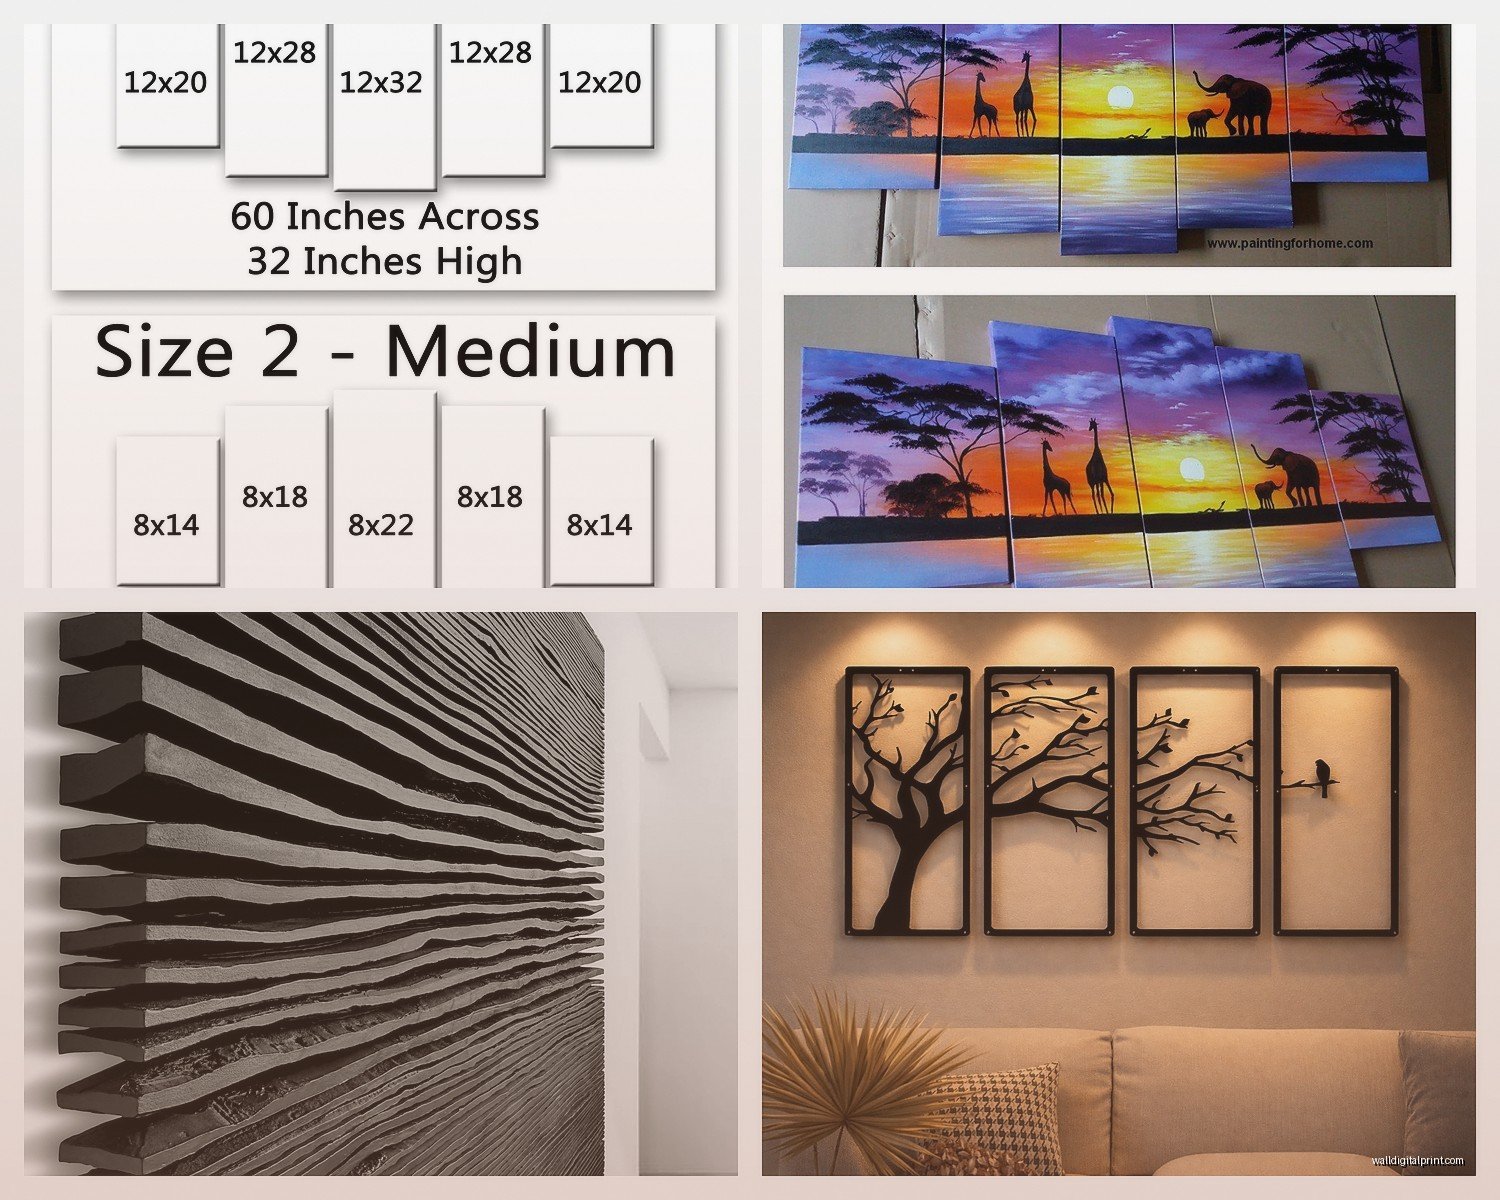
The individual panel sizes vary but typically the center panel is tallest. Like you’ll see sets where the sides are 12×24, the middle ones are 12×28, and center is 12×32. That cascading effect is what creates the panoramic feel.
Canvas vs Print vs Metal (Textures Matter)
Wait I forgot to mention – the material makes a HUGE difference in how these look. Canvas is most popular and honestly easiest to work with because it’s lightweight. I prefer gallery-wrapped canvas where the image continues around the sides, so you don’t see white edges. Way cleaner look.
But here’s the thing about canvas – it can look cheap if the print quality is bad. You want at least 0.75-inch thick frames (that’s the depth), and the canvas should be tight with no visible sagging. I ordered a cheap set once from…I’m not gonna name the site but it rhymed with “Blish,” and the canvas was so loose it looked wrinkled. Total waste.
Metal prints are having a moment right now and they look incredible with modern or industrial spaces. They’re more expensive but the colors are SO vibrant. The issue is they’re heavy, so you need proper wall anchors. I use toggle bolts for anything over 5 pounds per panel.
Acrylic prints are the fancy option – super glossy, really high-end look. I used these in a law office once and they looked like they cost three times what they actually did. But they show fingerprints like crazy and you need professional installation usually because they’re bulky.
The Installation Process (AKA Why You Need a Friend)
Okay so funny story, I tried to hang a 5-panel set by myself last year and ended up with three holes I had to patch because I kept misjudging the position. Now I always grab someone to help, even if it’s just to hold panels while I step back and look.
Here’s my actual process:
Step 1: Map It Out
I use painter’s tape to mark where each panel will go on the wall. Like, full outline of each rectangle. This lets you see the spacing and overall layout before you commit to any holes. My dog always tries to eat the tape off the wall which is super helpful, thanks Murphy.
Step 2: Start with the Center Panel
Always hang the center panel first. This is your anchor point. Get this one level and at the right height, and everything else follows. I use a laser level now (like $25 on Amazon, total game changer) but a regular bubble level works fine.
The center panel goes at eye level basically. If you’re doing the 57-inch center point thing, measure from the floor to that point, then figure out where your hanger needs to be based on the panel height. So if your panel is 32 inches tall, the hanger should be at about 73 inches from the floor (57 + 16).
Step 3: Work Outward Symmetrically
Once center is up, I do the two panels immediately next to it, then the outer two. Keep your spacers consistent – I literally measure between each panel with a tape measure even though I’m using the foam spacers, because walls aren’t always straight and you gotta adjust.
This is gonna sound weird but I take a photo after each panel goes up and look at it on my phone. Your eye catches things in photos that you miss in person. Like if one panel is slightly higher or the spacing looks off.
Hardware That Actually Works
The hanging hardware that comes with most sets is…okay I’m not gonna say it’s garbage but it’s not great. Those tiny sawtooth hangers slip and can’t hold weight properly.
What I actually use:
- D-rings screwed into the back of the frame (way more stable than sawtooth)
- Picture hanging wire for smaller panels
- French cleats for anything heavy (over 10 pounds per panel)
- Wall anchors – always. Even if you hit a stud, I still use anchors because these sets have weight distributed across multiple points
For drywall, those threaded drywall anchors (EZ Ancor makes good ones) are rated for like 50 pounds and they actually hold. For plaster walls, you need toggle bolts or molly bolts. I learned this the hard way when a panel fell at 2am and scared me half to death.
Choosing the Right Image for Your Space
Not all panoramic images work for all rooms, and this is where I see people make impulse buys. That dramatic ocean sunset might look amazing online but feels weird in a bedroom where you want calm energy.
Some guidelines I follow:
Living rooms: Can handle bold, dramatic images. Landscapes, cityscapes, abstract designs with movement. This is your statement piece room.
Bedrooms: Softer, more calming imagery. I do a lot of misty forests, beaches at dawn, soft abstracts. Nothing too energetic or with harsh colors.
Offices/studies: Structured images work well – architectural shots, geometric abstracts, black and white photography. Stuff that feels sophisticated but not distracting.
Dining rooms: This is tricky because you don’t want food imagery (trust me, it’s weird), but you want something that feels social. I like urban scenes, wine country landscapes, or warm-toned abstracts.
Color Coordination (Without Being Matchy-Matchy)
You don’t need to match your art exactly to your room colors – actually please don’t, it looks too coordinated. But you want some color relationship. I pull 1-2 colors from the art that echo somewhere in the room. Like if your 5-panel set has blue tones, maybe your throw pillows or a rug picks up that blue. That’s enough.
Or go totally neutral with the art and let it be a contrast point. Black and white panoramic sets are super versatile and work with basically any color scheme.
Common Problems and Fixes
Panels aren’t level with each other: This happens when walls aren’t perfectly straight. Don’t try to make them level with the wall – make them level with each other. Sometimes that means one hanger is slightly higher than another to compensate for wall irregularities.
The set feels too small: You probably didn’t go big enough. This is the most common issue. When in doubt, size up. A too-small 5-panel set just looks like you ran out of art budget.
It looks cluttered: Too much other stuff on the wall. These sets are meant to be the focal point. Clear everything else off that wall – other art, shelves, decorative objects. Let the panoramic set breathe.
Colors look different than online: Yeah, this happens. Monitor colors aren’t accurate. If you’re picky about color (I am), order from places with good return policies or request a sample if possible. Some companies will send you a small print sample for like $10.
Where to Actually Buy These
I’ve tried probably two dozen different sources at this point. For clients, I usually go with specialized wall art retailers because quality is consistent. For my own place or budget projects, there are good options on Etsy (search for sellers with lots of reviews), Society6 has some cool designs, and honestly even Amazon has decent options if you read reviews carefully.
What I look for: clear photos of the actual product (not just renderings), measurements for each individual panel, info about canvas depth, and reviews that mention installation. If people are saying “easy to hang” or “came with good hardware,” that’s a green flag.
Oh and check if it comes ready to hang or if you need to add hardware. Some sets ship with D-rings already attached, others you gotta install them yourself.
The Money Question
These range from like $50 for small cheap sets to $500+ for large high-quality ones. I usually tell people to budget around $150-250 for a good medium-sized set. That gets you decent print quality, proper canvas depth, and reasonable materials.
The $50 sets can work if you’re renting and don’t wanna invest much, but expect them to look…budget. The colors might be muted, canvas might be thin, hardware will probably be flimsy.
For investment pieces in main living areas, spend the money. A $300 5-panel set that looks amazing for 10 years is way better value than a $60 one you replace in two years because it looks cheap.
Last thing – some companies do custom 5-panel sets from your own photos, which is pretty cool if you have a great landscape shot or want something totally unique. I did this with a client’s Iceland vacation photos and it turned out incredible. More expensive obviously, but super personal.
Just measure twice, hang once, and don’t try to do it alone while watching Netflix. Ask me how I know.