Wall Art Guide, Wall Art Tutoriels
Plaster Relief Wall Art: Raised Texture Sculptural Designs

Jun
So I’ve been obsessing over plaster relief wall art lately and honestly it started because I walked into this boutique hotel in Portland and just stopped dead in my tracks staring at this textured wall. Like my husband kept walking and didn’t notice I wasn’t there anymore for a solid minute.
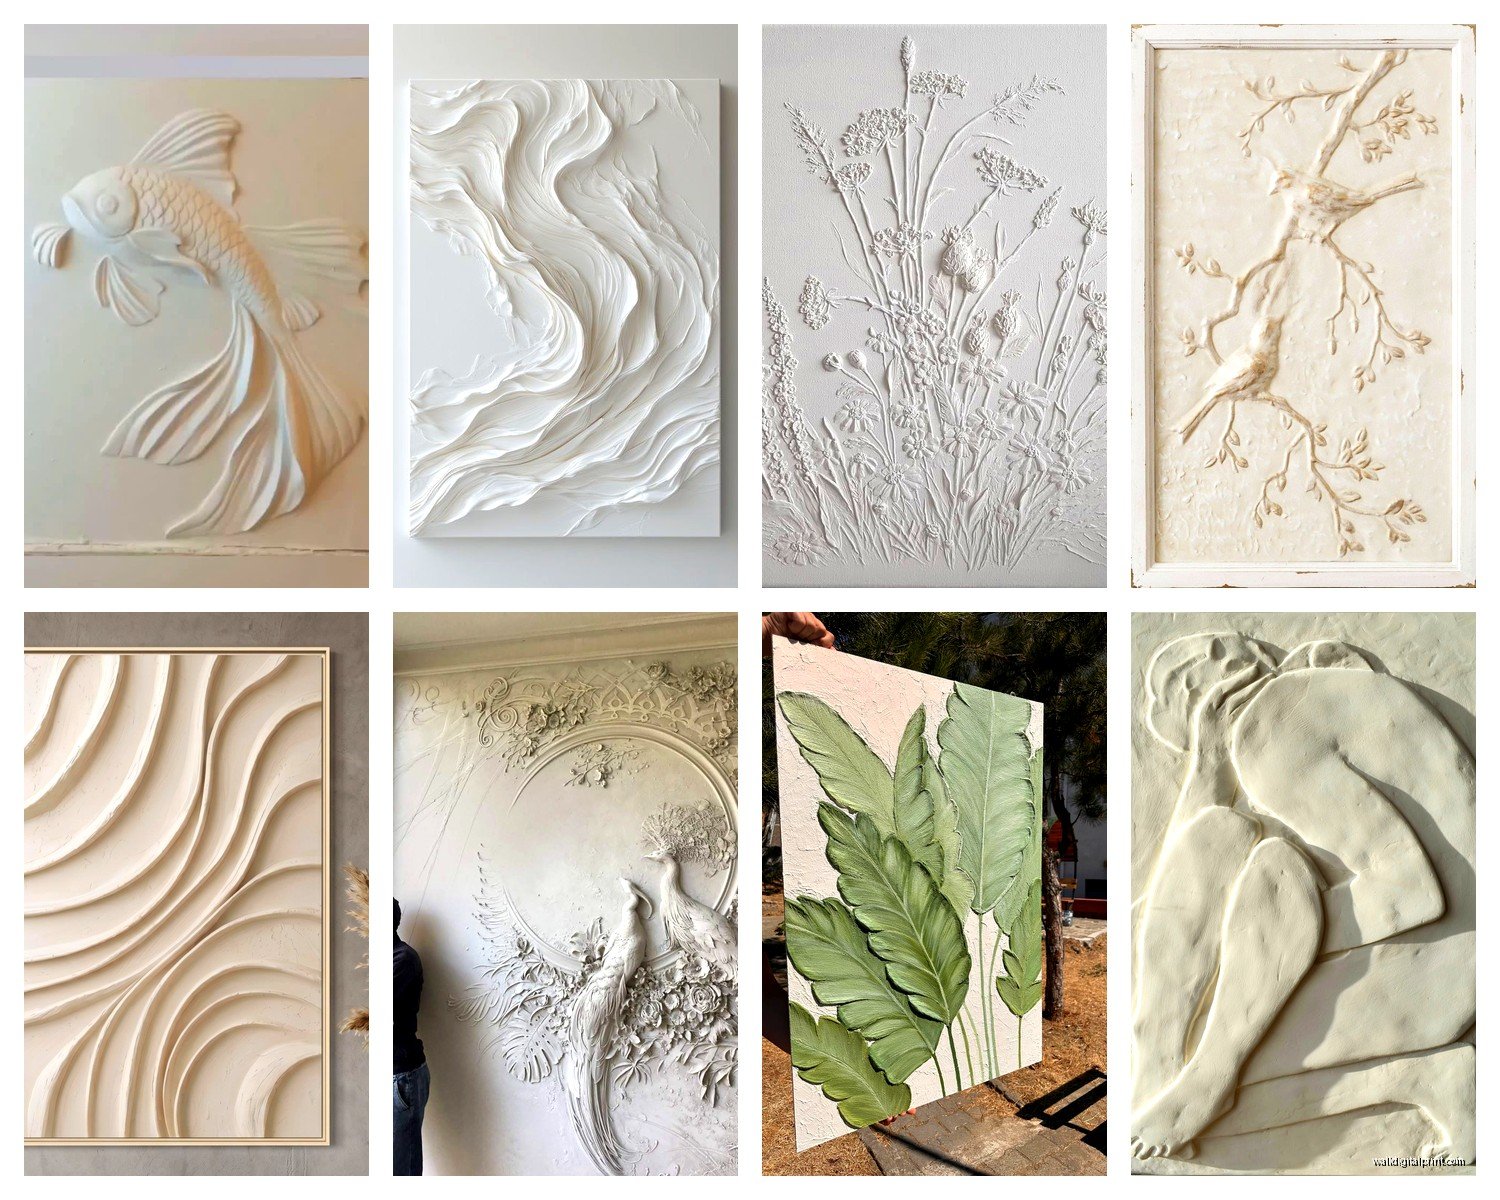
The thing about plaster relief is it’s basically raised sculptural designs on your wall – think 3D texture but super sophisticated. Not like those awful popcorn ceilings from the 70s, more like… if a painting and a sculpture had a baby. You can go full Renaissance with cherubs and florals or super minimal with just geometric shapes and honestly both work depending on your space.
Getting Started Without Losing Your Mind
Okay so first decision – are you buying pre-made panels or going DIY? Because these are wildly different commitments. I tried both and here’s the real tea.
Pre-made panels run anywhere from $200 to like $2000+ depending on size and intricacy. Companies like Modular Arts and 3D Wall Panels make really gorgeous stuff that you literally just mount and paint. I used their geometric pattern in my dining room and installation took maybe 3 hours? You need construction adhesive, a level (do NOT eyeball this, I tried once and it haunts me), and someone to help hold panels while adhesive sets.
But if you’re gonna DIY the actual relief work… you need patience. And I mean PATIENCE. My cat knocked over my first attempt while it was drying and I genuinely just sat on the floor for ten minutes questioning my life choices.
Materials That Actually Matter
For DIY plaster relief you want joint compound or actual plaster of Paris. I’ve tested both extensively because apparently I have nothing better to do on weekends. Joint compound is more forgiving – dries slower so you can fix mistakes, doesn’t crack as easily. Plaster of Paris gives you sharper details but sets FAST. Like you’ve got maybe 20 minutes before it’s unworkable.
You’ll also need:
- Palette knives in various sizes – get the metal ones not plastic
- Silicone molds if you want repeated patterns
- A hawk board for holding your plaster
- Sandpaper (120 grit and 220 grit)
- Primer and paint obviously
- Stencils or you can freehand if you’re brave
Oh and another thing – get a decent respirator mask. The dust is no joke and I learned this the hard way after spending a weekend sanding and then coughing for three days straight.
Design Planning Before You Commit
This is gonna sound weird but I always do a test panel on foam board first. Just a small 2×2 foot section where I practice the technique and see if I actually like living with the texture. Because here’s what nobody tells you – raised texture collects dust and shadows change throughout the day which completely transforms how it looks.
I had a client who was OBSESSED with this ornate floral design she saw on Pinterest. We did a sample panel and after living with it for a week she was like “this is too busy I hate it.” Thank god we tested first because removing dried plaster from a wall is absolutely miserable.
For placement, focal walls work best. Behind a bed, fireplace wall, entryway – somewhere your eye naturally goes. I tried doing an entire room once and it was sensory overload. Like being inside a baroque church but residential and kind of aggressive?
Scale and Proportion Stuff Nobody Explains
Small rooms need simpler patterns. I know everyone wants the dramatic Instagram moment but a tiny bedroom with elaborate relief work feels claustrophobic. Go for subtle geometric patterns or simple linear designs.
Bigger spaces can handle ornate designs but you still need restraint. My rule is if the pattern repeat is smaller than 6 inches, step back and reconsider. Too small reads as busy texture rather than intentional sculpture.
Ceiling height matters too – standard 8 foot ceilings look best with relief that doesn’t extend more than 2-3 inches from the wall. Higher ceilings can go deeper. I did 5 inch relief in a space with 12 foot ceilings and it was perfect but that same depth in my 9 foot living room would look absolutely insane.
Actually Applying the Plaster
Okay so assuming you’re doing this yourself… prep your wall first. It needs to be clean, primed, and honestly? Slightly textured helps adhesion. If you’ve got smooth drywall, rough it up a bit with sandpaper.
Start with a base coat if you’re building up significant depth. Just smooth joint compound applied with a trowel, maybe 1/8 inch thick. Let this dry completely – like 24 hours. I know it seems dry after 6 hours but trust me, it’s not.
For the actual relief design, work in sections. I usually do about 2 square feet at a time because you gotta work while it’s wet. If you’re using stencils, tape them down REALLY well. Any movement and your crisp design becomes this weird blurry mess.
Apply plaster through stencil with palette knife, building up layers gradually. Multiple thin layers always look better than one thick layer. This is where patience comes in because each layer needs to dry before the next.
The Freehand Approach
Wait I forgot to mention – if you’re going freehand sculptural (which I actually prefer for organic designs), sketch your design on the wall with pencil first. Then build up plaster following those lines.
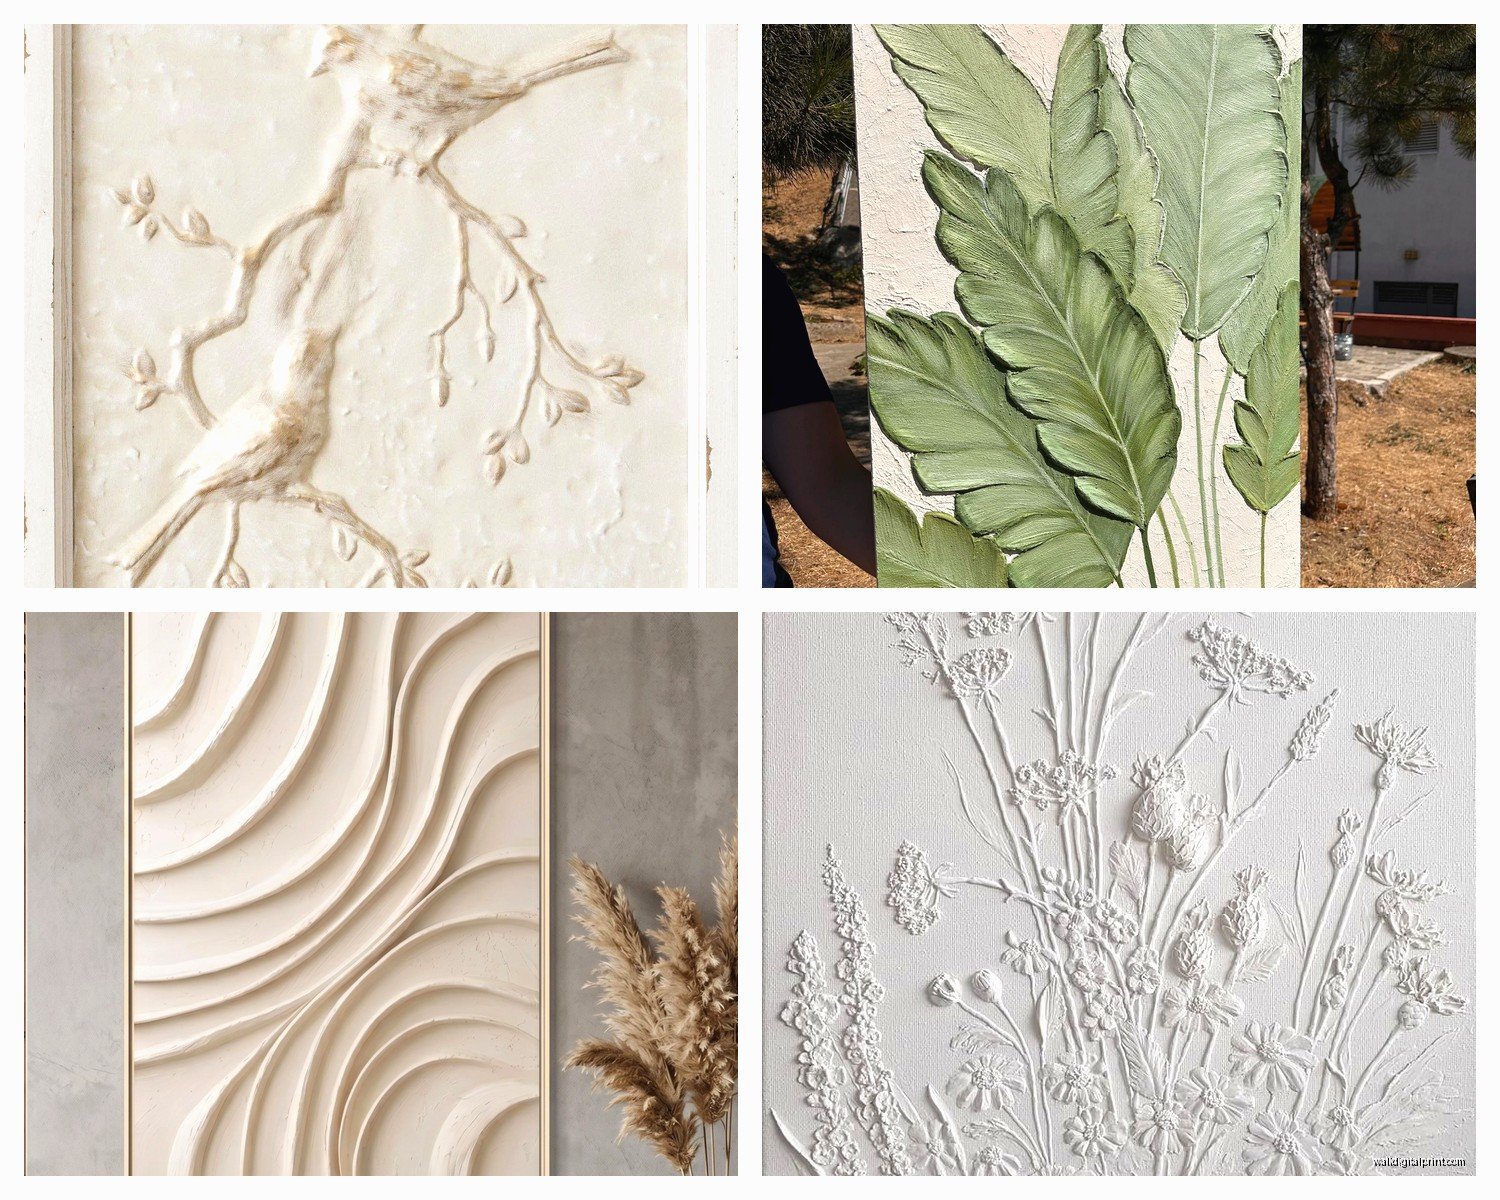
For raised florals or botanical designs, start with the background elements and work forward. So stems first, then leaves, then flower petals on top. This creates natural depth and shadow.
I use different tools for different effects – palette knives for sharp edges, fingers for smooth organic curves (wear gloves unless you want your hands absolutely destroyed), even things like old credit cards or rubber scrapers. My favorite random tool is actually this silicone spatula from my kitchen that creates these perfect curved indentations.
Drying and Finishing
Here’s where people mess up – they don’t let it dry enough before sanding. Joint compound needs like 48 hours for thick applications. You’ll think it’s dry but the inside is still soft and if you sand too early everything just crumbles.
Sanding is tedious but necessary. Start with 120 grit to knock down any really rough spots, then 220 grit for smoothing. You’re not trying to make it perfectly smooth though – some texture is the whole point. I just clean up obvious drips and any spots where the texture looks accidental rather than intentional.
The dust situation during sanding is UNREAL. I was watching The Crown while sanding my last project and had to stop because I literally couldn’t see the TV through the dust cloud. Do this with windows open and that respirator on.
Paint Choices That Actually Enhance Texture
This is crucial – paint choice completely changes how your relief reads. Flat paint minimizes shadows, high gloss emphasizes every little bump. I usually go with eggshell or satin finish because it’s that sweet spot where you get shadow definition but it’s not overwhelming.
Color-wise, monochromatic looks most sophisticated. White on white is classic and works with literally any decor style. But I’ve also done deep charcoal where the shadows create almost black crevices and it’s super dramatic.
Two-tone techniques are gorgeous too – base coat in one color, then dry brush a lighter or darker shade over the raised areas. This makes the sculpture element really pop. I did this in a powder room with sage green base and cream highlights and people literally stop mid-conversation to stare at the wall.
Metallic paints are having a moment too. Gold or bronze on plaster relief gives major luxury hotel vibes. Just use actual metallic paint, not that craft store stuff. I like Modern Masters metallics – they’re pricey but the coverage and finish is worth it.
Specific Design Ideas I’ve Actually Done
Geometric patterns are easiest for beginners. I did this chevron design using just painter’s tape and a straight edge – applied plaster in triangular sections, pulled tape before it fully dried, boom. Instant modern texture.
For something more organic, I’m obsessed with this olive branch design I did for a client’s bedroom. Used actual olive branches as stamps – just pressed them into wet plaster to create impressions, then went back and built up around those impressions to make them stand out. Took forever but looks like a million bucks.
Abstract sculptural stuff is my favorite though. No pattern, just building up plaster in random flowing shapes. Very Georgia O’Keeffe meets minimalist sculpture. You can’t really mess this up because there’s no right or wrong – it’s just texture and form.
Oh and if you wanna go full extra, nested frames or panels within panels looks incredible. Create a recessed rectangle on your wall, then add relief design within that frame. The layered depth is chef’s kiss.
Problems You’re Definitely Gonna Encounter
Cracking happens. Especially if you go too thick too fast or don’t let layers dry. Small cracks you can just fill with more joint compound and sand smooth. Big cracks mean you probably need to scrape that section and start over, sorry.
Sagging is another issue with detailed designs. If your plaster is too wet it’ll literally slide down the wall before it sets. This happened to me with an elaborate art deco sunburst and I watched in horror as the rays slowly drooped. Mix your plaster thicker – it should hold its shape when you pile it on your palette knife.
Uneven texture where some areas are deeper than others usually means you’re not being consistent with application pressure or plaster consistency. I still struggle with this honestly. Best fix is just embrace it as part of the handmade charm because trying to make it perfectly uniform will drive you insane.
Maintenance Real Talk
Plaster relief collects dust like crazy. I vacuum mine with the brush attachment every couple weeks. For deeper cleaning, slightly damp microfiber cloth works but don’t scrub hard or you’ll damage details.
It’s pretty durable once sealed with paint but you can chip it if you bang furniture against it. Ask me how I know (moved a dresser, caught the corner, watched a chunk of my beautiful floral design fall off). Touch-ups are possible but matching texture is tricky.
If you’re renting, maybe don’t do this. Or do it on foam board panels you can remove. Because getting this off walls is a nightmare involving scrapers and a lot of regret.
When to Just Buy Pre-Made
Look, sometimes DIY isn’t the move. If you want really intricate historical reproductions – like actual Renaissance or Victorian molding designs – just buy pre-made. The skill level to recreate that by hand is professional sculptor territory.
Also if you need to cover a large area, pre-made panels are faster and more consistent. I spent 40 hours doing a 10×12 accent wall by hand. You could install panels in a fraction of that time.
Budget-wise though… pre-made adds up fast. My DIY materials for that project cost maybe $150. Panels would’ve been $1500+. So there’s the trade-off – time versus money.
Companies I actually recommend: Modular Arts for geometric modern stuff, Decorators Supply for historical reproduction designs, Art3d for budget-friendly options that still look decent. I’ve used all three for various client projects and they’re reliable.
Just make sure whatever you buy is actual plaster or gypsum, not foam painted to look like plaster. The weight and feel is completely different and foam reads as cheap in person even if photos look okay.
Honestly the best thing about plaster relief is how it transforms light in a space – that’s something flat art can never do and it’s why I keep coming back to this technique even though it’s kind of a pain. The way shadows shift throughout the day makes your wall this living changing thing and yeah okay that sounds cheesy but it’s true.